NinjaTrader Pivot Point Indicator
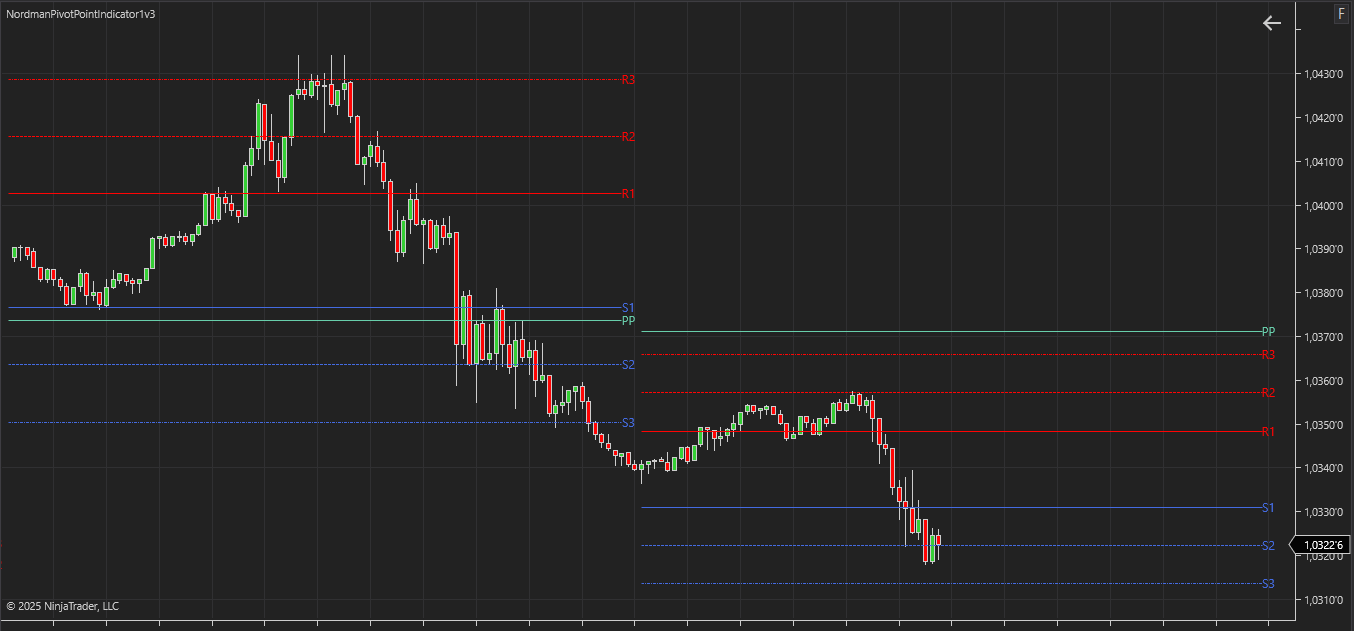
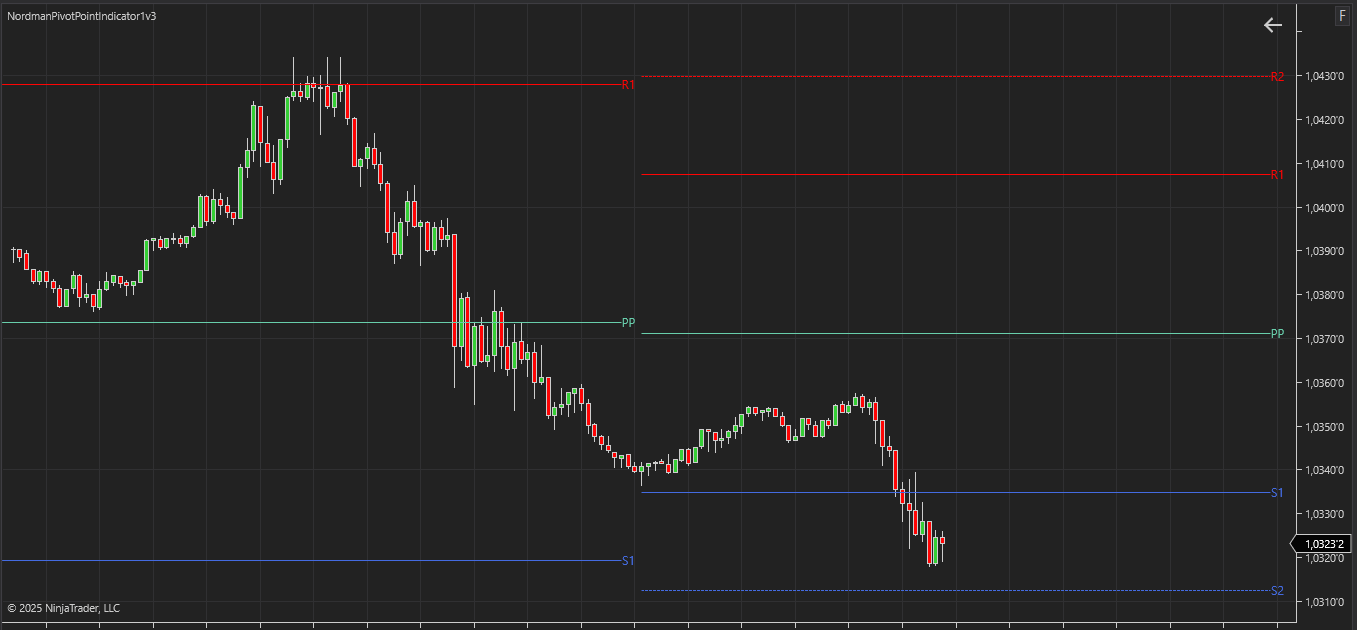
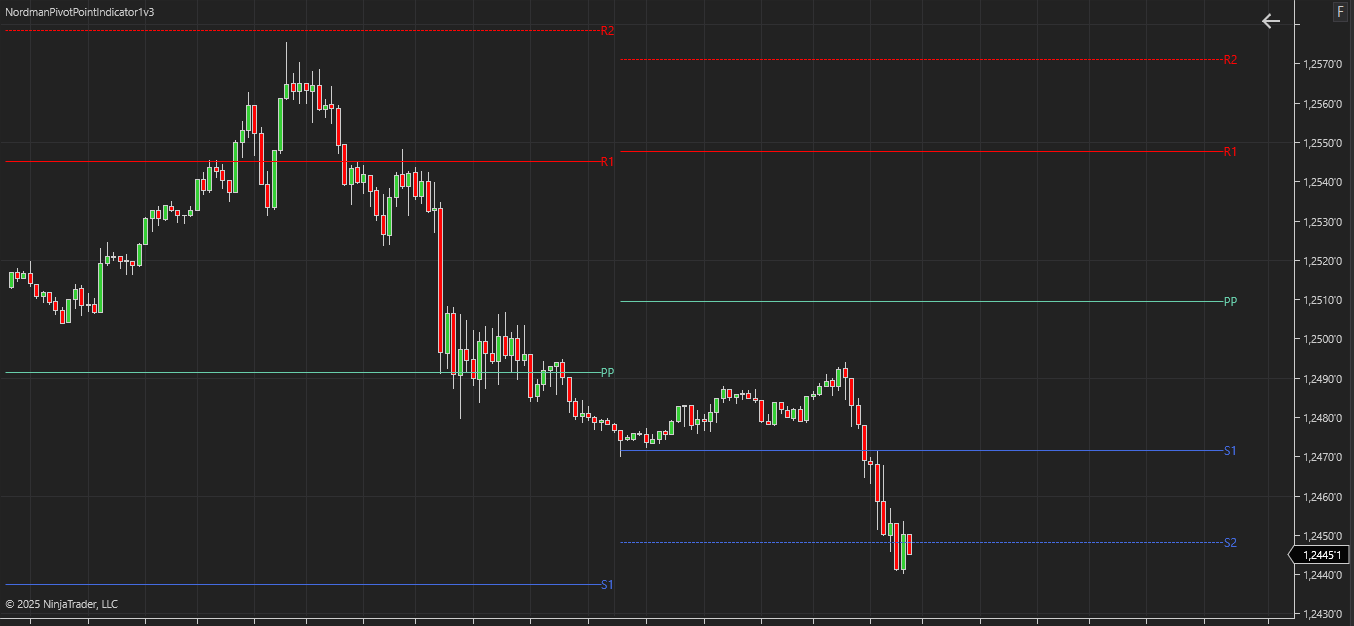
NinjaTrader Pivot Point Indicator calculates structural price reference levels using six methods — Classical, Woodie, Fibonacci, Camarilla, CPR, and DeMark — across daily, weekly, monthly, or custom sessions. Individual level display, configurable periods, and alerts.
Already a subscriber or have purchased a product?
What the Pivot Point Indicator Does
The Pivot Point Indicator calculates a set of structural price reference levels derived from the high, low, close, and in some methods the open of the previous calculation period. The central Pivot Point (PP) serves as the primary reference level — additional support and resistance levels are then calculated around it using method-specific formulas. The calculation method determines how many levels are produced, how they are positioned relative to PP, and what price inputs are weighted most heavily.
The calculation period is configurable across four options: Daily, Weekly, Monthly, or Custom. The custom option allows any arbitrary session interval to be defined. Individual support and resistance levels can be enabled or disabled independently for visual clarity. Multiple periods can be displayed simultaneously using the Display Session Number parameter.
Analytical Context
The six methods produce structurally different level distributions because they weight different price inputs differently. Classical and Fibonacci methods weight high, low, and close equally in the PP calculation. Woodie weights the open more heavily, pulling the PP toward the current session. Camarilla positions all levels relative to the close rather than the PP, producing a tighter cluster of levels near the prior close. DeMark adjusts the input formula based on the close-to-open relationship — producing different level positions depending on whether the session closed higher, lower, or equal to the open.
The choice of method affects not just the visual output but the structural context of the levels: a level produced by Camarilla at a given price is analytically different from a Classical level at the same price, because the underlying calculation logic and the price input weighting are different.
How to Interpret and Use the Pivot Point Indicator
The indicator supports six calculation methods, each producing a different level structure.
(1) Standard / Classical
Calculates the Pivot Point from the high, low, and closing prices of the chosen period. Four symmetrical support and resistance levels are derived from the Pivot Point and the price range.
Classical Pivot Points formula
R3 = R2 + RANGE (same as: PP + RANGE * 2)
R2 = PP + RANGE
R1 = (2 * PP) - LOW
PP = (HIGH + LOW + CLOSE) / 3
S1 = (2 * PP) - HIGH
S2 = PP - RANGE
S3 = S2 - RANGE (same as: PP - RANGE * 2)
S4 = S3 - RANGE (same as: PP - RANGE * 3)
R1–R4 — resistance levels 1 to 4; PP — the Pivot Point; S1–S4 — support levels 1 to 4; RANGE — the maximum minus the minimum for a given timeframe.
(2) Woodie
Applies additional weight to the opening price of the new period — producing a Pivot Point positioned closer to the current market price than the Classical method.
Woodie Pivot Points formula
R3 = HIGH + 2 * (PP - LOW) (same as: R1 + RANGE)
R2 = PP + RANGE
R1 = (2 * PP) - LOW
PP = (HIGH + LOW + (Period’s Open * 2)) / 4
S1 = (2 * PP) - HIGH
S2 = PP - RANGE
S3 = LOW - 2 * (HIGH - PP) (same as: S1 - RANGE)
S4 = S3 - RANGE
R1–R4 — resistance levels 1 to 4; PP — the Pivot Point; S1–S4 — support levels 1 to 4; RANGE — the maximum minus the minimum for a given timeframe.
(3) Fibonacci
Calculates the Pivot Point using the standard formula, then derives three support and resistance levels using Fibonacci ratios applied to the price range.
Fibonacci Pivot Points formula
R2 = PP + (0.618 * RANGE)
R1 = PP + (0.382 * RANGE)
PP = (HIGH + LOW + CLOSE) / 3
S1 = PP - (0.382 * RANGE)
S2 = PP - (0.618 * RANGE)
S3 = PP - (1 * RANGE)
R1–R3 — resistance levels 1 to 3; PP — the Pivot Point; S1–S3 — support levels 1 to 3; RANGE — the maximum minus the minimum for a given timeframe.
(4) Camarilla
Uses a fixed multiplier (1.1) applied to the price range to calculate four support and resistance levels positioned symmetrically around the closing price of the calculation period.
Camarilla Pivot Points formula
R3 = CLOSE + RANGE * 1.1/4
R2 = CLOSE + RANGE * 1.1/6
R1 = CLOSE + RANGE * 1.1/12
PP = (HIGH + LOW + CLOSE) / 3
S1 = CLOSE - RANGE * 1.1/12
S2 = CLOSE - RANGE * 1.1/6
S3 = CLOSE - RANGE * 1.1/4
S4 = CLOSE - RANGE * 1.1/2
R1–R4 — resistance levels 1 to 4; PP — the Pivot Point; S1–S4 — support levels 1 to 4; RANGE — the maximum minus the minimum for a given timeframe.
(5) Central Pivot Range (CPR)
Calculates a standard Pivot Point and an additional level derived from the high and low of the period. Three support and resistance levels are produced.
Central Pivot Range (CPR) formula
R2 = PP + (HIGH - LOW)
R1 = (2 * PP) - LOW
PP = (HIGH + LOW + CLOSE) / 3
S1 = (2 * PP) - HIGH
S2 = PP - (HIGH - LOW)
S3 = PP - 2 * (HIGH - LOW)
R1–R3 — resistance levels 1 to 3; PP — the Pivot Point; S1–S3 — support levels 1 to 3; RANGE — the maximum minus the minimum for a given timeframe.
(6) DeMark
Calculates one primary reference level and one support and one resistance level. The input value X is weighted differently depending on the relationship between the closing and opening prices.
DeMark’s Pivot Points formula
If CLOSE > OPEN then X = ((HIGH * 2) + LOW + CLOSE)
If CLOSE = OPEN then X = (HIGH + LOW + (CLOSE * 2))
R1 = X / 2 - LOW
PP = X / 4
S1 = X / 2 - HIGH
R1 — resistance level; PP — the Pivot Point; S1 — support level; X — weighted input that depends on the closing price relative to the opening price.
Indicator Settings & Parameters
Full parameter reference, grouped by configuration area.
| Parameter | Description |
|---|---|
| Calculation | |
| Pivot Type | Selects the calculation method.
|
| Period Session | Selects the data period.
|
| Display | |
| Display Session Number | The number of periods to display simultaneously on the chart. |
| Display R1–R4 / S1–S4 | Enables or disables individual support and resistance levels independently. |
| Alerts | |
| Alerts | Configure alert delivery for level interactions: sound notifications, email, and pop-up messages — each configurable independently. |
System Requirements & Installation
What you need to run the indicator, how to download and install it in NinjaTrader 8, and how the license works.
System Requirements
- Platform
- NinjaTrader 8 (Desktop)
- Operating system
- Windows 10 or Windows 11
- Instruments
- Futures, forex, stocks and ETFs supported by NinjaTrader
- Data
- NinjaTrader’s native data connections
Not available on NinjaTrader Web or Mobile. NinjaScript indicators run in NinjaTrader Desktop only.
License Terms
- Lifetime License
- This indicator only, 1 PC, one-time payment, free updates included.
- All-Access Subscription
- All indicators and trade copiers, billed monthly, cancel anytime, updates included while the subscription is active.
- Free trial
- 5 days on the subscription plan. If not cancelled, the subscription starts automatically.
- License binding
- Linked to your email and to the computer on which it was first activated.
- Moving to another computer
- Available on request through support.
Installation
- Get access
Start the free trial, subscribe, or buy a lifetime license on this page.
- Download
The indicator is not sent by email. Open (top right of this page) and enter the email you used for your trial, subscription or purchase. The installation file (.zip) downloads to your computer.
- Import into NinjaTrader 8
In the Control Center, go to
Tools → Import → NinjaScript Add-Onand select the downloaded .zip file. Do not unzip it. - Add to a chart
Open a chart, click Indicators, select the indicator from the list and apply it.
- Activate the license
In the indicator settings, enter the same email. On first activation, the license is linked to that email and to your computer.
Updating: When a new version is released, download it again through and import it the same way over the existing version.
Installation questions? Contact support, Monday to Friday.
Related Products
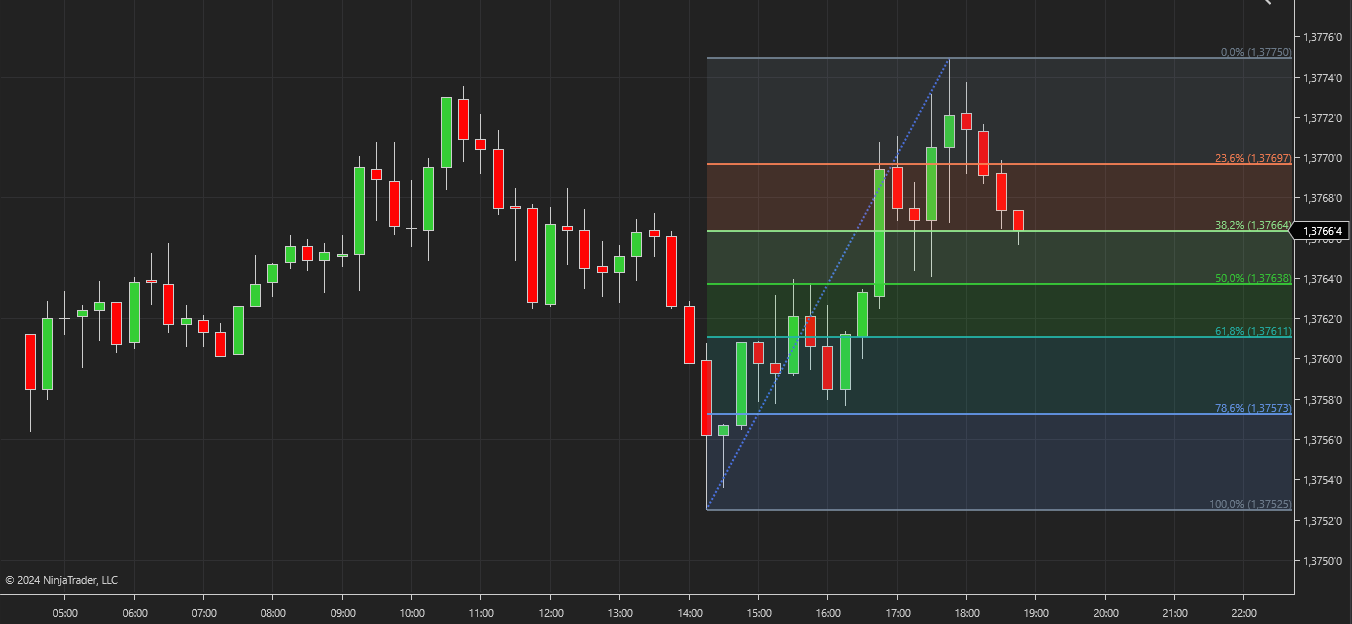
"Best Seller" and "Trending" reflect Nordman Algorithms sales and usage data, January–September 2026.
Disclaimer — Software Use & Risk Disclosure
Nordman Algorithms is a trade name of Nordman Algorithms OÜ (Reg. No. 14435535), registered in Tallinn, Estonia.
Software Use
Software Nature & User Responsibility — Nordman Algorithms provides algorithmic software tools for technical analysis. Nordman Algorithms is not a financial advisor and is not liable for any losses. All trades conducted based on the software’s output are executed at the user’s sole discretion and risk.
Visual Markers & Signal Disclosure — This software may display visual markers (such as arrows, dots, or alerts) when predefined mathematical conditions are met. These markers are provided for educational and analytical purposes only, must not be interpreted as financial guidance, and do not constitute a recommendation to buy, sell, or hold any financial instrument. Users must independently validate all visual cues within their own trading methodology.
No Financial Advice — Nordman Algorithms does not provide discretionary trading signals, investment advice, or managed signal services. Our software represents a mathematical visualization of historical and real-time data. The appearance of a visual marker does not guarantee a profitable trade or predict future market behavior.
Read the full Terms of Service →Risk Disclosure
Trading Risk Warning — Futures, Forex, and options trading involve significant risk. Risk capital is money that can be lost without jeopardizing financial security. Only risk capital should be used for trading. Past performance is not indicative of future results. An investor could potentially lose all or more than the initial amount committed.
ESMA Risk Warning — Financial instruments, especially those involving leverage such as CFDs and Forex, are complex and carry a high risk of rapid financial loss. Our software provides analytical outputs and visual markers based on predefined mathematical conditions and does not mitigate or reduce inherent market risks. You should carefully consider whether you understand how leveraged financial instruments work and whether you can afford the high risk of losing your capital.
CFTC Rule 4.41 — Hypothetical or simulated performance results have inherent limitations. Unlike actual performance records, simulated results do not represent real trading. Because trades have not actually been executed, these results may under- or over-compensate for the impact of market factors such as liquidity. Simulated results are also subject to the benefit of hindsight. No representation is being made that any account will achieve profits or losses similar to those shown.
Read the full Risk Disclosure →Trademark Notice — NinjaTrader® is a registered trademark of NinjaTrader Group, LLC. No NinjaTrader company has any affiliation with the owner, developer, or provider of the products or services described herein, or any interest, ownership or otherwise, in any such product or service, or endorses, recommends or approves any such product or service.
Need a different setup?
We can customize this indicator to your workflow, or convert it into a fully automated trading strategy with risk management and trailing-stop logic. Fixed-price quote before development begins.