MT5 SMT Divergence Indicator
MT5 SMT Divergence Indicator detects Classic and Hidden SMT divergence between correlated instruments directly on the MetaTrader 5 chart. The indicator supports Forming and Confirmed SMT states, configurable swing validation, five independent qualification filters — Volume, EMA, Higher Timeframe EMA, VWAP, and Kill Zones — and a dedicated sub-window for comparing one or two correlated instruments alongside the primary chart.
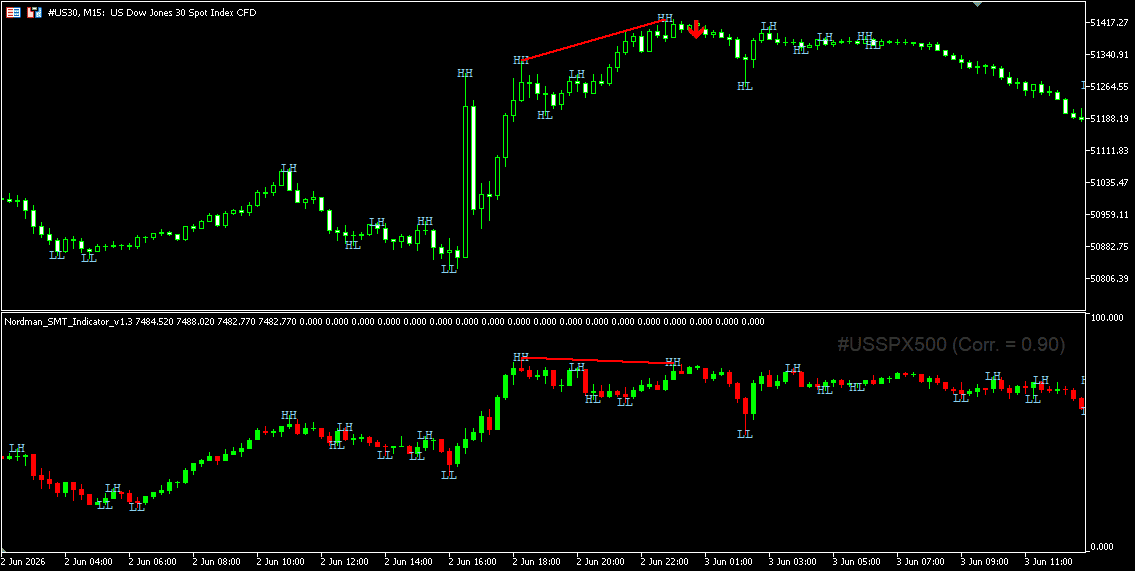
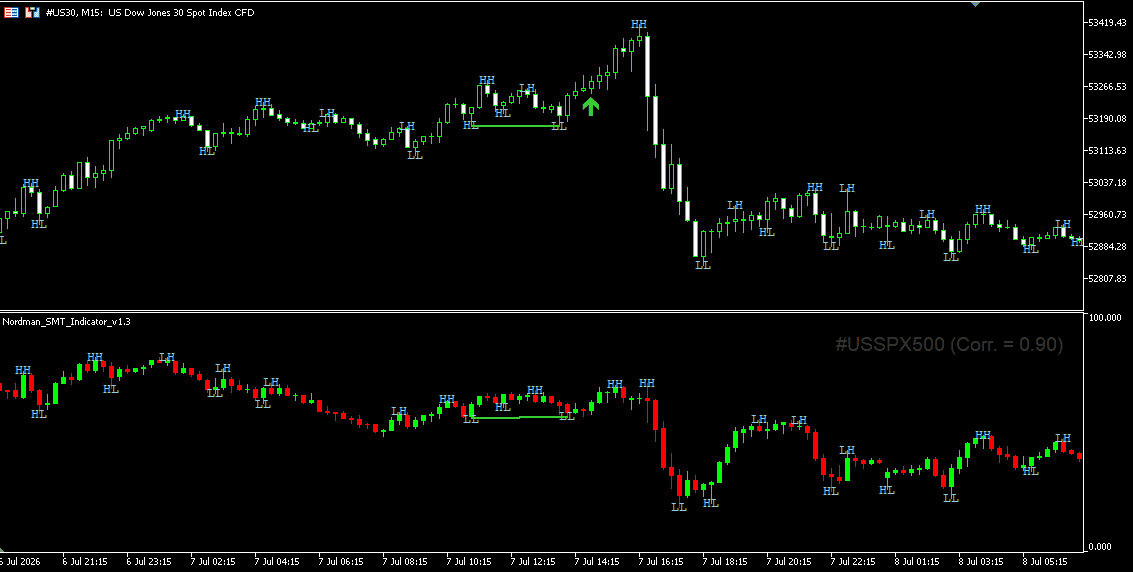
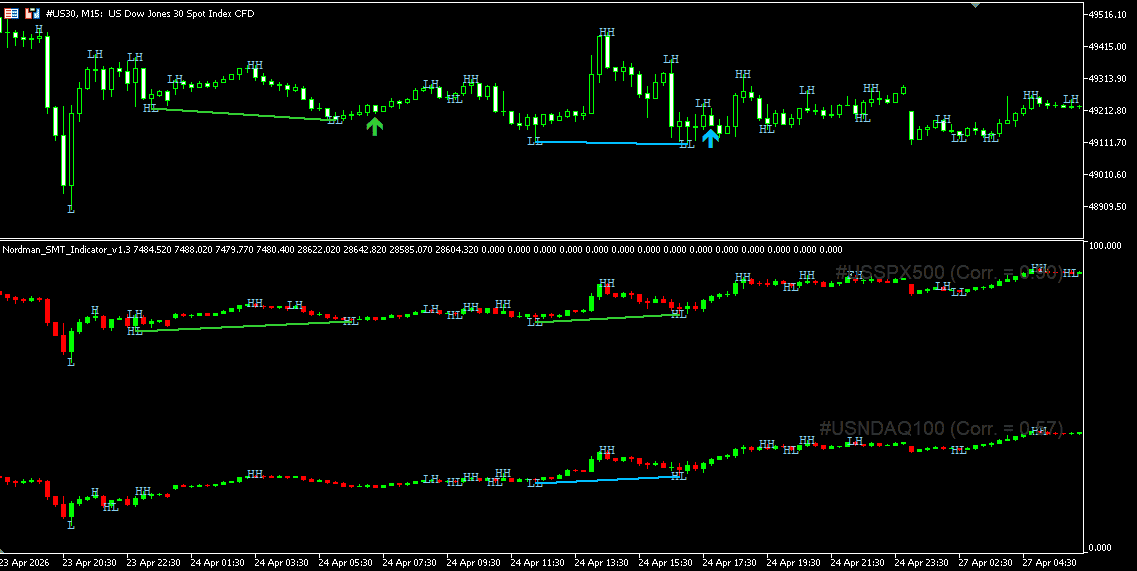
Already a subscriber or have purchased a product?
SMT Divergence Concept Explained
SMT (Smart Money Technique) Divergence is an intermarket divergence concept used in ICT (Inner Circle Trader) and Smart Money Concepts (SMC) analysis.
Correlated instruments tend to print similar structural moves. When one instrument breaks to a new high or low and its correlated counterpart doesn’t follow, that divergence is what the MT5 SMT Divergence Indicator detects.
Classic SMT looks for failed confirmation. One instrument clears a structural extreme, the other falls short. Bearish Classic SMT forms when one instrument pushes to a higher high while the correlated one doesn’t. Bullish follows the same logic in reverse.
Hidden SMT works the opposite way — the correlated instrument is the one making the stronger move while the analyzed instrument holds back. This pattern is typically read as continuation rather than a structural reversal.
Detecting SMT accurately depends heavily on how swing points are defined and how closely the two instruments’ swings need to align in time. The MT5 SMT Divergence Indicator is built around configurable validation rather than fixed pattern matching.
SMT Divergence Indicator — Key Features
Classic & Hidden SMT Detection
The MT5 SMT Divergence Indicator supports both Classic and Hidden divergence types, each toggleable independently.
Classic SMT detects the condition where two correlated instruments stop moving in the same direction at a structural extreme — one confirms the move, the other doesn’t. Bearish Classic SMT appears when the analyzed instrument prints a fresh high and the correlated one does not confirm it. Bullish Classic SMT mirrors that logic at lows.
Hidden SMT captures the opposite structural relationship. The correlated instrument extends further, the analyzed instrument does not. Where Classic SMT is typically associated with reversal conditions, Hidden SMT is generally read as continuation.
Both types work independently for bullish and bearish conditions — Classic only, Hidden only, or both running at the same time.
Classic SMT Divergence
Hidden SMT Divergence
Forming & Confirmed SMT States
Every SMT condition detected by the indicator carries one of two states: Forming or Confirmed.
Forming picks up the divergence while the underlying swing is still developing. The structure hasn’t been validated yet — which means it can still resolve without becoming a confirmed event. Forming SMT appears earlier, before the swing is fully validated.
Confirmed waits. The swing behind it has to pass Swing Strength validation before anything is drawn. By the time a Confirmed SMT appears, the structural picture behind it is complete.
Both states can run simultaneously. If the swing later passes validation, the Forming marker is replaced by the Confirmed SMT. If it does not, the Forming marker stays on the chart while Forming SMT markers are enabled — it doesn’t disappear retroactively.
Confirmed SMT
Forming and Confirmed SMT
Swing Structure & SMT Validation
SMT detection in the MT5 SMT Divergence Indicator is built on swing structure, not candle patterns.
The settings that control how swings are identified directly affect what gets detected and what gets filtered out.
Swing Strength defines what qualifies as a structural high or low. A higher value means the indicator waits for more developed swing points before they’re accepted into the detection logic. A lower value makes it more reactive to shorter-term structure.
Vertex Match Tolerance handles the timing gap between two instruments’ swing points. Correlated instruments rarely print their highs and lows on exactly the same bar — this setting defines how many bars apart they’re allowed to be and still count as a matching pair.
SMT Min Bars Distance sets a minimum separation between the two swing points that form a divergence. Structures that develop too quickly and too close together are excluded.
A minimum displacement filter adds one more layer — requiring a defined amount of price movement between swing points before the divergence qualifies. Displacement can be measured in ticks or as a percentage.
SMT Detection Filters
The MT5 SMT Divergence Indicator includes five optional filters that control when a divergence condition is allowed to register.
Available filters:
- Volume Filter
- EMA Filter
- Higher Timeframe EMA Filter
- VWAP Filter
- Kill Zones Filter
The Volume Filter evaluates current volume against a rolling lookback average. Divergence conditions that form below the configured volume threshold are not registered.
The EMA Filter and Higher Timeframe EMA Filter both work around directional alignment — one on the current chart timeframe, the other on a selected higher timeframe. A divergence only qualifies if price is positioned on the correct side of the relevant moving average.
The VWAP Filter applies the same directional logic relative to session VWAP — bullish conditions require price above VWAP, bearish conditions require price below.
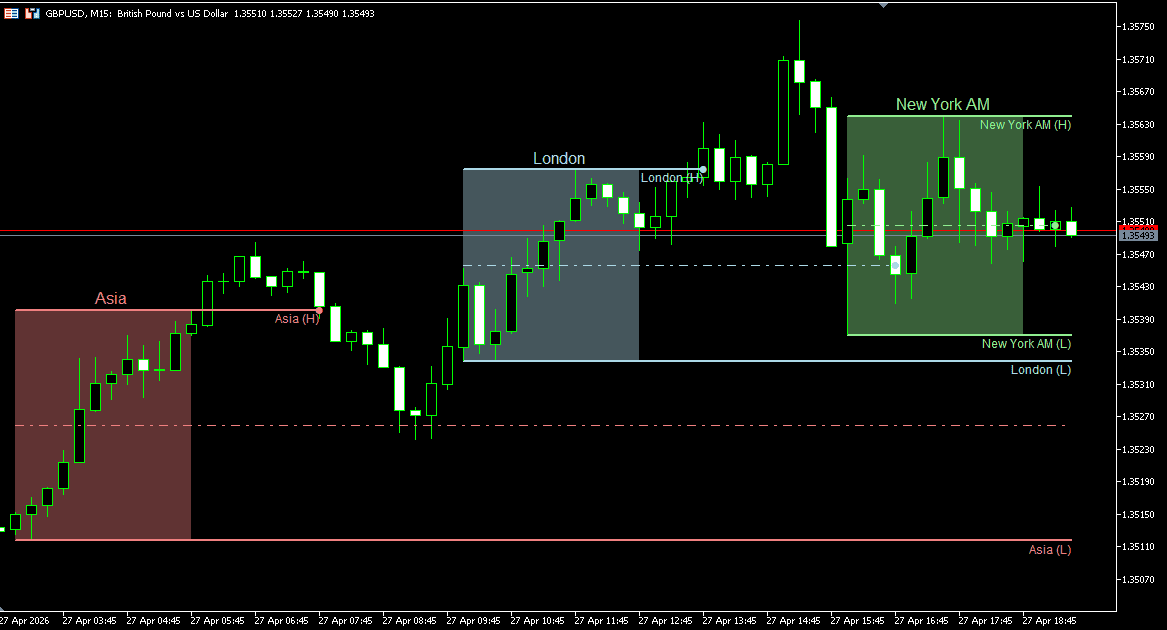
The Kill Zones Filter restricts detection to specific session windows. Asia, London, New York, and a custom session can each be configured independently. Divergence conditions that form outside the active sessions are ignored.
Kill Zones Filter
Each filter is independent. Any combination can be active at the same time.
Correlated Asset Comparison
The MT5 SMT Divergence Indicator displays the correlated instrument in a separate sub-window below the main chart, keeping both instruments visible without opening a second chart.
Divergence lines are drawn across both the primary chart and the correlated sub-window simultaneously, so the structural divergence between the two instruments is visible in context rather than having to be reconstructed from memory.
A second correlated instrument can be added alongside the first, allowing three-way comparison from a single chart. Each correlated instrument gets its own visual representation in the sub-window, and SMT structures from the first and second comparisons use separate color sets so they remain visually distinct.
Visual Customization
Every visual element of the MT5 SMT Divergence Indicator can be adjusted independently.
Bullish and bearish SMT structures have separate color settings, and Forming and Confirmed states each use their own color — so all four combinations are visually distinct on the chart at the same time. When a second correlated instrument is active, its SMT structures use a separate color set that doesn’t conflict with the primary comparison.
Classic and Hidden SMT labels can be renamed or turned off entirely. Swing label color and font size for both labels and swing points are configurable independently.
The correlated sub-window includes controls for the instrument’s value display — font size, color, and opacity can all be set separately from the main chart layout.
How to Interpret and Use the SMT Divergence Indicator
Reading Classic SMT Divergence
A Classic SMT condition appears when the two instruments being compared reach a structural extreme but only one of them confirms it.
In a bearish Classic SMT, the analyzed instrument prints a higher high while the correlated instrument does not reach the same level. A bullish Classic SMT follows the same logic at swing lows — the analyzed instrument breaks below its previous low while the correlated instrument holds above its own.
The divergence itself doesn’t define what happens next. It marks a point where the two instruments stopped agreeing on structure — how that context is used is part of the broader analysis.
Understanding Hidden SMT Divergence
Hidden SMT uses the same two-instrument comparison but reads the structural relationship in reverse.
In a bearish Hidden SMT, it’s the correlated instrument that extends to a stronger high while the analyzed instrument does not follow. Bullish Hidden SMT mirrors this at lows — the correlated instrument breaks to a lower low while the analyzed instrument does not.
Because the structural relationship is inverted compared to Classic SMT, Hidden divergence is generally read in a different analytical context — more commonly associated with continuation than reversal.
Forming vs Confirmed SMT
The distinction between Forming and Confirmed SMT comes down to when the underlying swing structure is considered complete.
A Forming condition is registered while the swing is still developing. The bar count required by Swing Strength hasn’t been satisfied yet, which means the swing could still shift before it finalizes. These conditions appear earlier on the chart but carry the structural uncertainty that comes with unconfirmed swings.
A Confirmed condition only registers once the swing has cleared the Swing Strength requirement. The structural context behind it is settled — no further bars are needed for the swing to be valid.
Running both simultaneously gives a layered view: Forming conditions show what’s developing, Confirmed conditions show what’s structurally complete.
Using Correlated Asset Comparison
The sub-window approach keeps both instruments on the same screen without requiring a separate chart layout. The correlated instrument’s price action is scaled and displayed below the primary chart, with divergence lines connecting the relevant swing points across both.
When a second correlated instrument is active, both appear in the sub-window alongside each other. This makes it possible to observe whether a divergence between the primary instrument and the first correlated instrument is also present — or absent — in the second comparison at the same time.
Using Filters and Kill Zones
The five filters in the MT5 SMT Divergence Indicator each add a separate condition that must be satisfied before a divergence is registered. None of them change how SMT is detected — they only control whether a detected condition is allowed through.
Volume, EMA, Higher Timeframe EMA, and VWAP filters all evaluate the current market context at the moment of detection. Each one checks a different reference — volume relative to its average, price relative to a moving average on the current timeframe, price relative to a moving average on a higher timeframe, and price relative to session VWAP.
Kill Zones work differently from the other four. Rather than evaluating a market condition, they restrict detection to a defined time window. A divergence that forms outside the configured sessions is ignored regardless of whether the other filters would have passed it through.
All five can be combined. The more filters are active, the narrower the set of conditions that qualify.
Indicator Settings & Parameters
Full parameter reference, grouped by configuration area.
| Parameter | Description |
|---|---|
| SMT Settings | |
| History Bars To Process | Defines how many historical bars are included in the SMT detection calculation. |
| Swing Strength | Sets how strictly highs and lows must be validated before they qualify as structural swing points. |
| Correlated Instrument | Selects the primary correlated instrument used for SMT divergence comparison. |
| Enable Second Correlated Instrument | Allows the primary instrument to be compared against an additional correlated instrument. |
| Second Correlated Instrument | Selects the optional second correlated instrument. |
| Enable Classic SMT | Enables detection of Classic SMT divergence. |
| Enable Hidden SMT | Enables detection of Hidden SMT divergence. |
| SMT Min Bars Distance | Sets the minimum number of bars required between the swing points used in an SMT structure. |
| Vertex Match Tolerance | Sets how closely swing points between correlated instruments must align in time. |
| SMT Strength Calculation Type | Selects whether SMT strength is measured in ticks or as a percentage.
|
| SMT Min Strength Ticks | Sets the minimum SMT strength required when strength is measured in ticks. |
| SMT Min Strength Percentage | Sets the minimum SMT strength required when strength is measured as a percentage. |
| Enable Forming SMT | Enables early-stage SMT detection before the related swing structure is fully confirmed. |
| Filters | |
| Enable Volume Filter | Enables volume-based filtering for SMT conditions. |
| SMT Volume Lookback | Sets the lookback period used for volume comparison. |
| SMT Min Volume Multiplier | Sets the minimum volume threshold required for SMT validation. |
| Enable HTF Filter | Enables Higher Timeframe EMA filtering for SMT detection. |
| Higher Timeframe Type | Selects the higher timeframe unit used for HTF filtering.
|
| Higher Timeframe Minutes / Hours / Days | Sets the specific higher timeframe value used by the HTF filter. |
| HTF EMA Period | Sets the EMA period used for higher timeframe filtering. |
| Enable EMA Filter | Enables EMA-based filtering on the current chart timeframe. |
| EMA Filter Period | Sets the EMA period used by the EMA filter. |
| Enable VWAP Filter | Enables VWAP-based filtering for SMT conditions. |
| Enable KillZones | Restricts SMT detection to selected trading session windows. |
| Enable #1–#4 Session | Enables individual Kill Zone sessions independently. |
| Label | Sets the display label for each Kill Zone session. |
| Start Session (EST) / End Session (EST) | Sets the active time window for each Kill Zone session. |
| Session Color | Sets the background color for each Kill Zone session. |
| Session Opacity | Sets the transparency of the Kill Zone background. |
| Alerts & Markers | |
| Enable Confirmed SMT Alert | Triggers an alert when a Confirmed SMT condition appears. |
| Enable Confirmed SMT Marker | Displays a marker on the chart when a Confirmed SMT condition is detected. |
| Enable Forming SMT Alert | Triggers an alert when a Forming SMT condition appears. |
| Enable Forming SMT Marker | Displays a marker on the chart when a Forming SMT condition is detected. |
| Alerts | |
| Enable pop up alert | Displays an on-screen popup when an SMT alert event occurs. |
| Enable sound alert | Plays a sound notification when an alert is triggered. |
| Alert sound file | Selects the audio file used for sound alerts. |
| Enable email alert | Sends an email notification when an SMT alert event occurs. |
| Email to | Defines the recipient email address for alert notifications. |
Frequently Asked Questions
SMT Basics
SMT divergence is an intermarket divergence concept used in ICT and Smart Money Concepts methodologies. The MT5 SMT Divergence Indicator detects this condition when one instrument makes a new high or low while a correlated instrument fails to confirm the same move.
Classic SMT detects failed confirmation at structural extremes and is generally read as a possible reversal condition. Hidden SMT uses the inverted structural relationship and is generally read as continuation rather than reversal.
A Forming SMT condition appears before the related swing point has passed Swing Strength validation — the swing is still developing. A Confirmed SMT condition only appears once that swing clears validation and the structural context behind it is complete.
When a Forming SMT is later confirmed, its marker is replaced by the Confirmed SMT. When the swing does not pass validation, the Forming marker stays on the chart while Forming SMT markers are enabled — it doesn’t disappear retroactively. Confirmed SMT requires fully validated swing points before anything is drawn.
Features & Configuration
The MT5 SMT Divergence Indicator combines configurable Swing Strength, Vertex Match Tolerance for timing alignment between instruments, separate Forming and Confirmed states, five independent qualification filters, support for a second correlated instrument, and a dedicated sub-window for visual comparison of correlated assets.
Yes. A second correlated instrument can be enabled alongside the primary one, allowing three-way structural comparison from a single chart.
It defines how many bars apart two swing points are allowed to be while still counting as a structural match. The correlated instrument does not need to form its swing on the exact same bar as the primary instrument.
Yes. The Kill Zones filter restricts detection to Asia, London, New York, or a custom session window. Conditions that form outside the configured sessions are ignored.
System Requirements & Installation
What you need to run the indicator, how to download and install it in MetaTrader 5, and how the license works.
System Requirements
- Platform
- MetaTrader 5 (Desktop)
- Operating system
- Windows 10 or Windows 11
- Instruments
- Forex pairs, metals, indices, CFDs and other symbols available from your broker in MetaTrader 5
- Data
- Your broker’s price feed in MetaTrader 5, including the correlated instruments you select
Not available on MetaTrader 5 Web or Mobile. Custom indicators run in the MetaTrader 5 desktop terminal only.
License Terms
- Lifetime License
- This indicator only, 1 live and 1 demo account, one-time payment, free updates included.
- All-Access Subscription
- All indicators and trade copiers, billed monthly, cancel anytime, updates included while the subscription is active.
- Free trial
- 5 days on the subscription plan. If not cancelled, the subscription starts automatically.
- License binding
- Linked to your email and to your MetaTrader 5 trading accounts: one live account and one demo account.
- Computers
- Not restricted. The license is linked to your trading accounts, not to a specific computer.
Installation
- Get access
Start the free trial, subscribe, or buy a lifetime license on this page.
- Download
The indicator is not sent by email. Open (top right of this page) and enter the email you used for your trial, subscription or purchase. The indicator file (.ex5) downloads to your computer.
- Copy to the MetaTrader 5 data folder
In MetaTrader 5, go to
File → Open Data Folder, openMQL5 → Indicatorsand copy the downloaded .ex5 file there. - Add to a chart
Restart MetaTrader 5 or right-click Indicators in the Navigator window and select Refresh. Then drag the indicator from the Navigator onto a chart.
- Activate the license
In the indicator inputs, enter the same email. On first activation, the license is linked to that email and to the trading account the terminal is logged into.
If MetaTrader 5 asks for additional permissions when the indicator is attached, such as DLL imports or WebRequest access, allow them in the indicator’s Common tab or under
Tools → Options → Expert Advisors.
Updating: When a new version is released, download it again through and replace the existing .ex5 file in the same folder.
Installation questions? Contact support, Monday to Friday.
Related Products
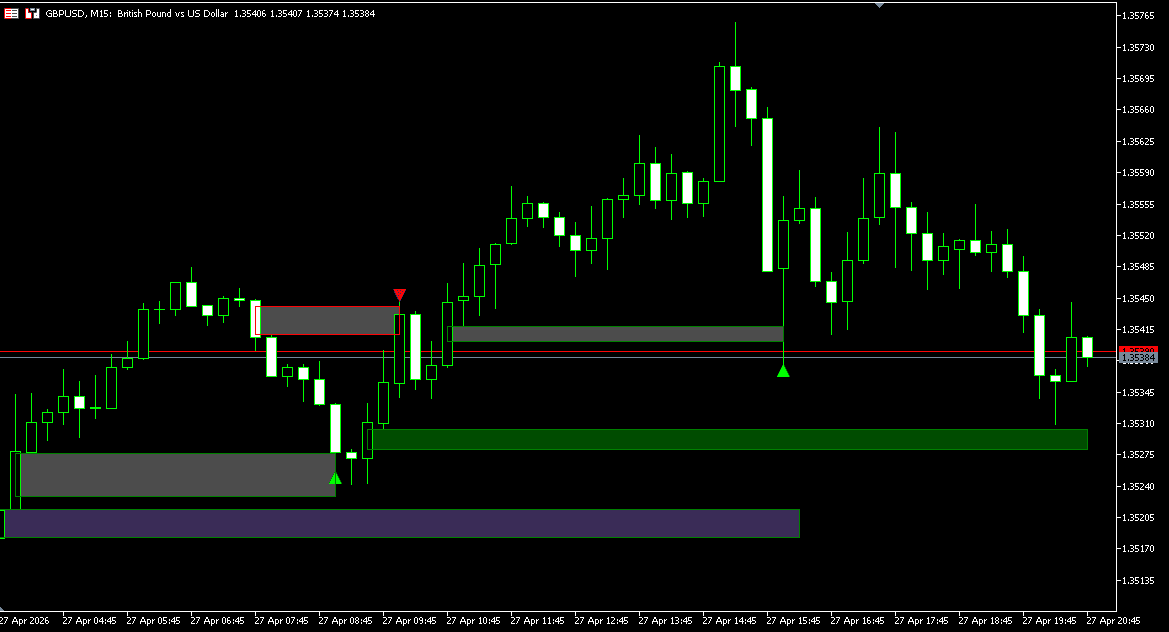
"Best Seller" and "Trending" reflect Nordman Algorithms sales and usage data, January–September 2026.
Disclaimer — Software Use & Risk Disclosure
Nordman Algorithms is a trade name of Nordman Algorithms OÜ (Reg. No. 14435535), registered in Tallinn, Estonia.
Software Use
Software Nature & User Responsibility — Nordman Algorithms provides algorithmic software tools for technical analysis. Nordman Algorithms is not a financial advisor and is not liable for any losses. All trades conducted based on the software’s output are executed at the user’s sole discretion and risk.
Visual Markers & Signal Disclosure — This software may display visual markers (such as arrows, dots, or alerts) when predefined mathematical conditions are met. These markers are provided for educational and analytical purposes only, must not be interpreted as financial guidance, and do not constitute a recommendation to buy, sell, or hold any financial instrument. Users must independently validate all visual cues within their own trading methodology.
No Financial Advice — Nordman Algorithms does not provide discretionary trading signals, investment advice, or managed signal services. Our software represents a mathematical visualization of historical and real-time data. The appearance of a visual marker does not guarantee a profitable trade or predict future market behavior.
Read the full Terms of Service →Risk Disclosure
Trading Risk Warning — Futures, Forex, and options trading involve significant risk. Risk capital is money that can be lost without jeopardizing financial security. Only risk capital should be used for trading. Past performance is not indicative of future results. An investor could potentially lose all or more than the initial amount committed.
ESMA Risk Warning — Financial instruments, especially those involving leverage such as CFDs and Forex, are complex and carry a high risk of rapid financial loss. Our software provides analytical outputs and visual markers based on predefined mathematical conditions and does not mitigate or reduce inherent market risks. You should carefully consider whether you understand how leveraged financial instruments work and whether you can afford the high risk of losing your capital.
CFTC Rule 4.41 — Hypothetical or simulated performance results have inherent limitations. Unlike actual performance records, simulated results do not represent real trading. Because trades have not actually been executed, these results may under- or over-compensate for the impact of market factors such as liquidity. Simulated results are also subject to the benefit of hindsight. No representation is being made that any account will achieve profits or losses similar to those shown.
Read the full Risk Disclosure →Trademark Notice — MetaTrader 5 and MT5 are trademarks of MetaQuotes Ltd. Nordman Algorithms is an independent software developer and is not affiliated with, sponsored by, or endorsed by MetaQuotes Ltd. References to MetaTrader 5 identify software compatibility.
Need a different setup?
We can customize this indicator to your specifications: add new functions, modify the logic, refine visuals, or integrate it with other MetaTrader 5 tools. We also convert indicators into Expert Advisors with trailing stops, position parameter controls, execution filters and rule-based automation built to your technical specifications.
Every project is delivered with full source code and post-delivery support. Fixed-price quote before development begins.