
Kill Zones are predefined trading session windows widely used in ICT (Inner Circle Trader) and Smart Money Concepts (SMC) methodologies to focus on periods when market participation and price movement often increase. These zones are commonly aligned with sessions such as London open and New York open, where liquidity and directional activity can become more pronounced than during quieter hours.
From a market structure perspective, Kill Zones help organize the trading day into time-based segments. Instead of viewing all hours equally, traders can separate lower-activity periods from windows where stronger movement, sweeps of liquidity, or session expansions may occur.
Session highs and lows formed during a Kill Zone are often monitored as reference levels later in the day. Price returning to these boundaries may show rejection, breakout continuation, or renewed volatility around the level. The midpoint of a session range can also serve as an internal balance reference.
The MT5 Kill Zones Indicator automates this framework by marking selected sessions on the chart, plotting pivot levels derived from each zone, and maintaining custom time-based reference prices for structured session analysis.
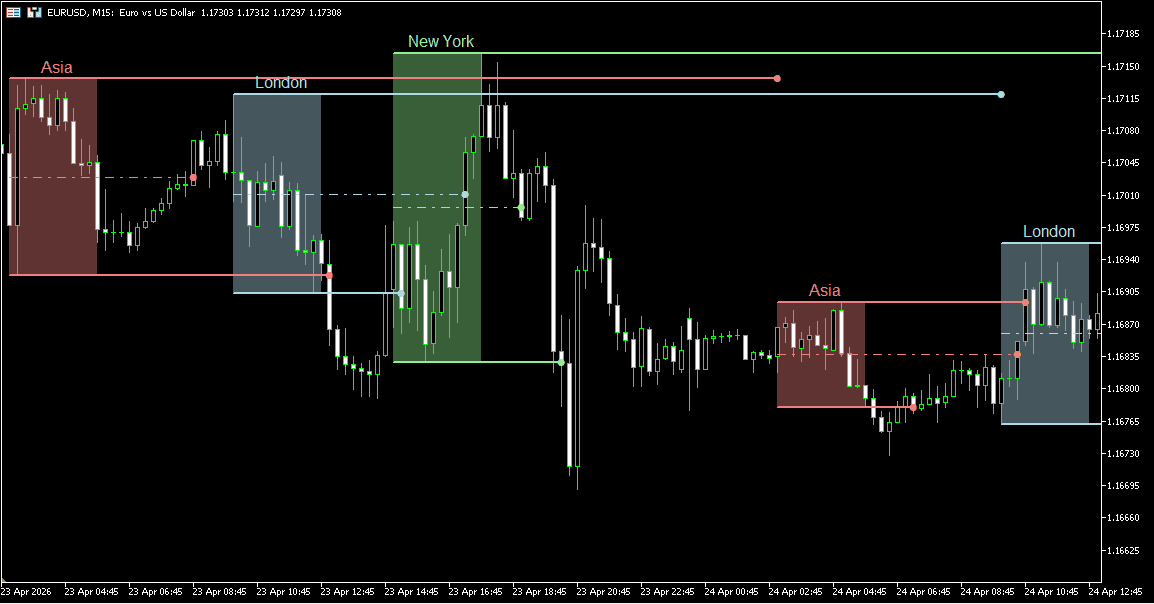
The indicator can display four independent session zones: Asia, London, New York, and one fully Custom Session. Each zone is plotted directly on the chart using user-defined start and end times, allowing the session framework to match personal schedules, broker feeds, or specific market hours.
Every session can be enabled or disabled individually. Session names can be edited, while colors and opacity levels can be adjusted for better visibility across different chart themes.
This makes it easy to focus only on the sessions that matter to your workflow.
For each completed Kill Zone, the indicator can project the session High Pivot, Low Pivot, and optional Middle Pivot derived from the session range.
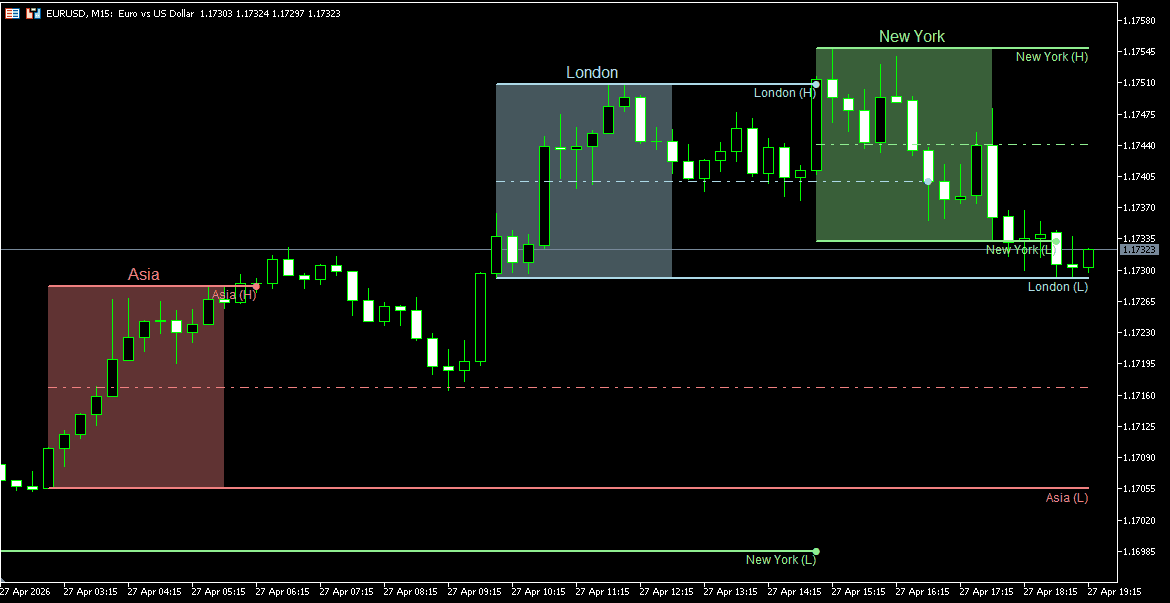
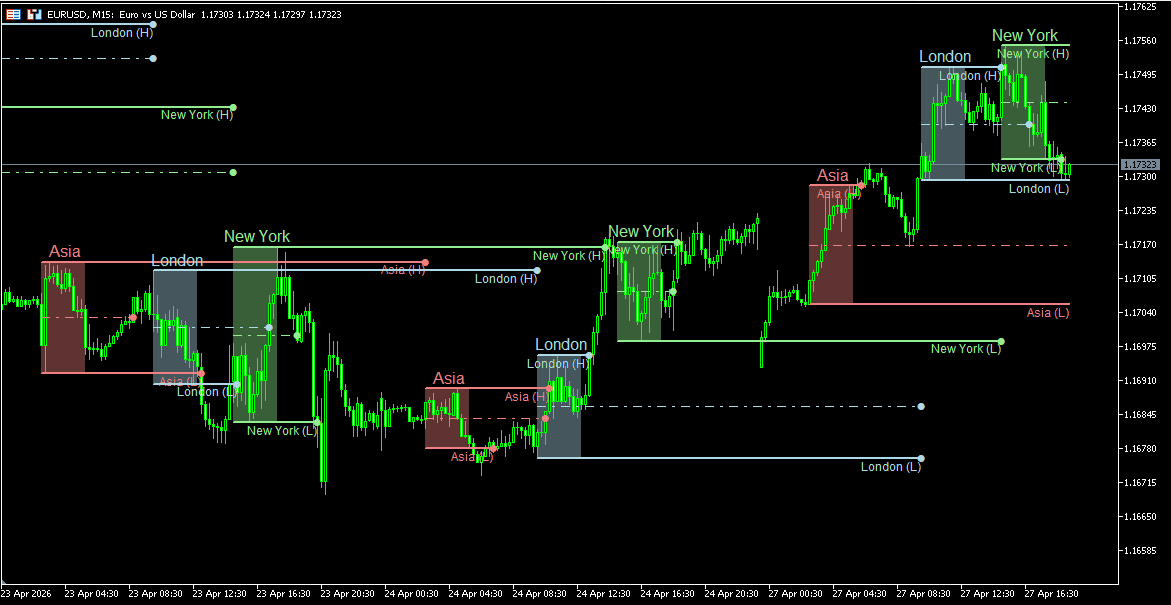
When Pivot Extension is enabled, active pivot levels continue forward after the session ends and remain visible until price breaks the specific line or the next matching session begins.
Without extension, session levels disappear the moment the zone closes — often before price has a chance to revisit them. With Pivot Extension enabled, relevant levels remain available while they still matter.
Traders often monitor these active pivots for rejection, continuation, or renewed volatility when price revisits earlier session boundaries later in the day.
Pivot labels and line widths can also be customized for faster recognition.
Most session tools stop at standard highs and lows. This indicator adds up to 10 independent Custom Pivots, giving enough flexibility to track levels such as Day Open, True Day Open, London Open, lunch references, or instrument-specific price markers.
Each custom pivot captures price at a specified start time and projects that level horizontally until the selected end time.
Every custom pivot includes its own name, color, line style, and width settings.

The indicator includes a flexible alert framework for active monitoring across multiple charts.
Available alerts include:
Alerts can be combined or reduced depending on how much real-time feedback is needed.
Run it quietly, or use it as an active session-monitoring tool.
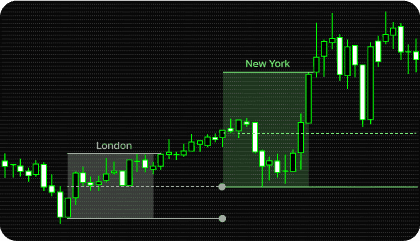
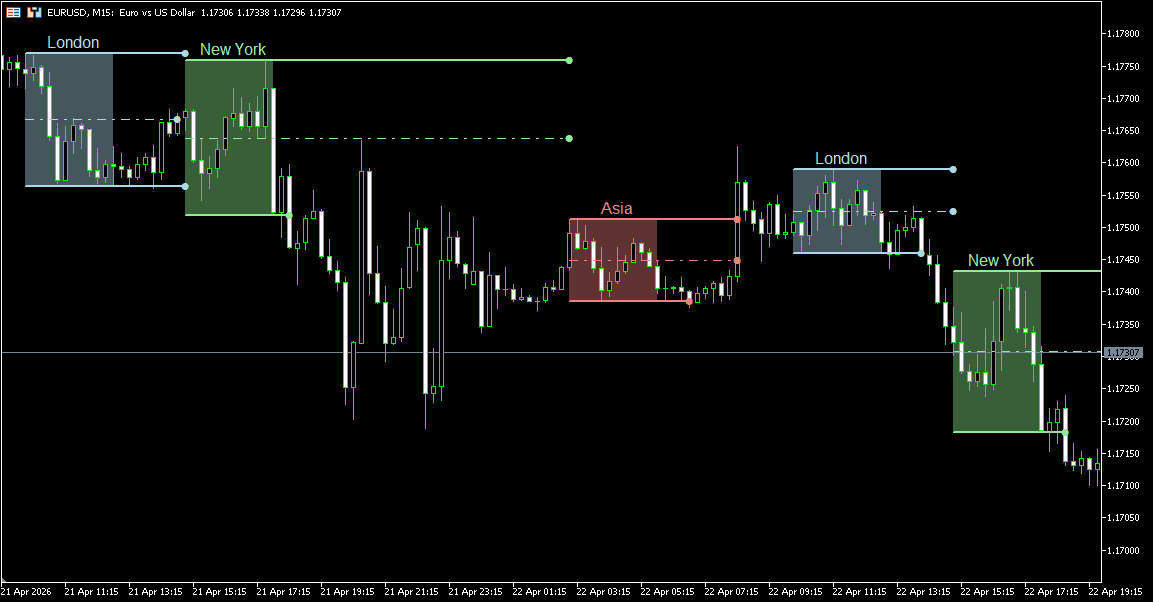
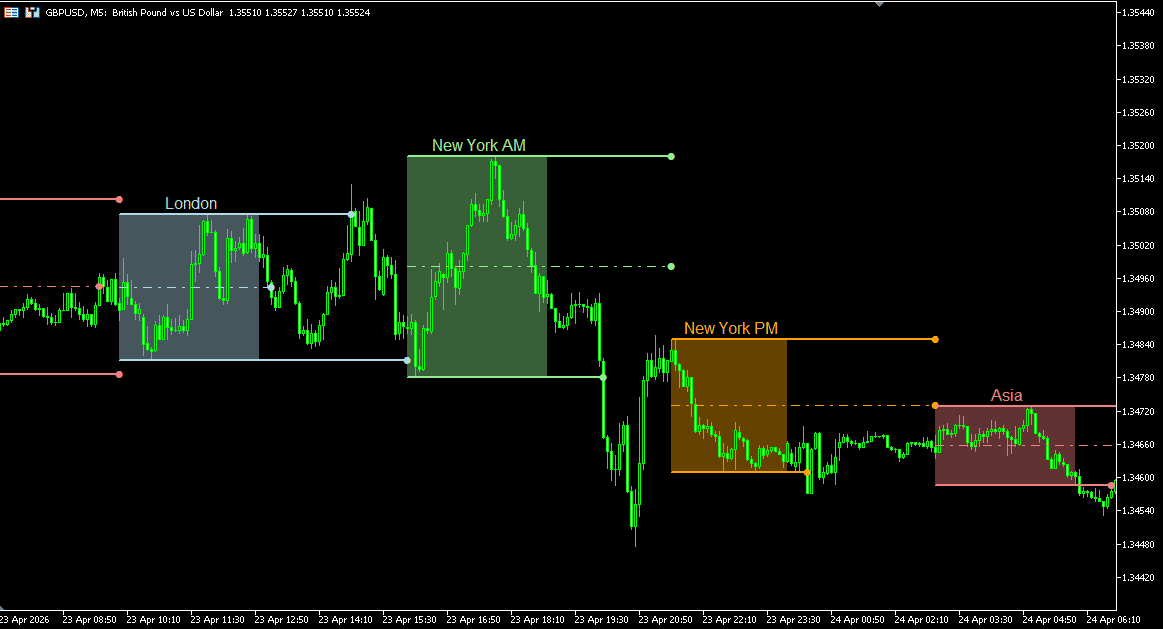
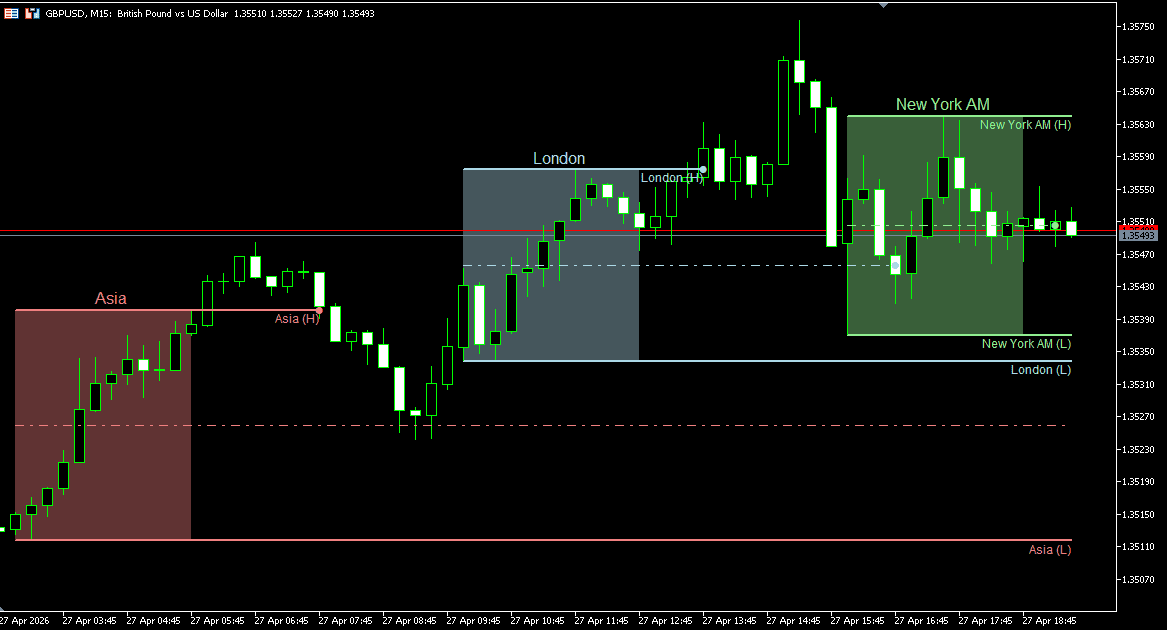
Each enabled Kill Zone is displayed as a shaded session window based on the selected start and end times. Standard presets include Asia, London, and New York, with an additional fully customizable session available.
These zones divide the trading day into structured time windows, making it easier to distinguish quieter hours from periods where participation and volatility may increase.
Many traders pay particular attention to London and New York overlaps, where session transitions can produce stronger movement.
After a session is completed, the indicator can plot the session High Pivot, Low Pivot, and optional Middle Pivot derived from that zone’s range.
When Pivot Extension is enabled, unbroken levels can remain active across future chart space until price breaches the level or the next same-named session begins.
These levels are often monitored when price revisits earlier session ranges later in the day. Common observations include rejection, breakout continuation, or renewed volatility around prior session boundaries.
Custom pivots capture price at a selected start time and extend that level until the chosen end time.
This can be used to maintain reference prices such as Day Open, True Day Open, London Open, Lunch Session Open, or any custom time-based level relevant to your workflow.
Because up to ten custom pivots are available, traders can build a personalized intraday framework directly on the chart.
Kill Zones become most useful when price behavior and time align — and that is where structured session analysis becomes valuable.
Examples include:
The goal is not to treat zones as automatic signals, but to organize price behavior around time and location.
Need changes to this indicator? We can customize it to your specifications — adding new functions, modifying logic, refining visuals, or integrating it with other trading tools.
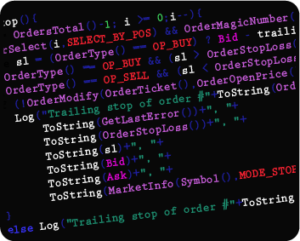
We also convert indicators into Expert Advisors with advanced features such as trailing stops, position parameter controls, execution filters, and rule-based automation built to your technical specifications.
Request a free consultation to discuss the technical scope, timeline, and available development options.
We are committed to the ongoing development and refinement of our indicators. If you’ve spotted a bug, feel that something essential is missing, or have ideas that could make the indicator even better, just send us a message. Your feedback helps us improve and deliver tools that truly meet traders’ needs.
A Kill Zone is a predefined time window often associated with increased market activity, liquidity, or directional movement. The concept is widely used in ICT and Smart Money Concepts (SMC) methodologies, especially around London and New York session opens.
The indicator supports four independent session zones:
Each zone can be enabled, renamed, recolored, or adjusted to custom start and end times.
After a session is completed, the indicator can project the session High Pivot, Low Pivot, and optional Middle Pivot based on that zone’s range.
These levels can remain active after the session ends and may be used as reference levels during later market activity.
When enabled, pivot levels continue forward after the session ends.
Each line remains visible until one of two events occurs:
For example, Asia pivots can remain active until the next Asia session if price has not broken them.
Custom pivots capture price at a selected start time and project that level until the chosen end time.
They are commonly used for levels such as:
Yes. Available alerts include:
This allows the tool to be used actively or passively depending on workflow.
Yes. Kill Zone analysis is commonly used on:
It is especially relevant where London and New York sessions influence volatility.
Many basic session tools only shade time windows on the chart.
This indicator also includes:
It functions as a broader session structure tool rather than simple chart shading.
Both approaches are common.
Some traders use Kill Zones as standalone time-based structure references, while others combine them with tools such as:
The indicator is designed to fit either workflow.
No. Session zones, pivot levels, and custom pivot levels are based on defined time windows and completed price data.
Once a session is formed or a custom pivot price is captured, the plotted reference levels are not retroactively shifted to create false historical signals.
As new sessions begin, naturally updated levels are created for the new trading period.
Nordman Algorithms is a trade name of Nordman Algorithms OÜ (Reg. No. 14435535), registered in Tallinn, Estonia.
Software Nature & User Responsibility — Nordman Algorithms provides algorithmic software tools for technical analysis. Nordman Algorithms is not a financial advisor and is not liable for any losses. All trades conducted based on the software’s output are executed at the user’s sole discretion and risk.
Visual Markers & Signal Disclosure — This software may display visual markers (such as arrows, dots, or alerts) when predefined mathematical conditions are met. These markers are provided for educational and analytical purposes only, must not be interpreted as financial guidance, and do not constitute a recommendation to buy, sell, or hold any financial instrument. Users must independently validate all visual cues within their own trading methodology.
No Financial Advice — Nordman Algorithms does not provide discretionary trading signals, investment advice, or managed signal services. Our software represents a mathematical visualization of historical and real-time data. The appearance of a visual marker does not guarantee a profitable trade or predict future market behavior.
Trading Risk Warning — Futures, Forex, and options trading involve significant risk. Risk capital is money that can be lost without jeopardizing financial security. Only risk capital should be used for trading. Past performance is not indicative of future results. View Full Risk Disclosure: https://www.nordman-algorithms.com/risk-disclosure/
ESMA Risk Warning — Financial instruments, especially those involving leverage such as CFDs and Forex, are complex and carry a high risk of rapid financial loss. Our software provides analytical outputs and visual markers based on predefined mathematical conditions and does not mitigate or reduce inherent market risks. You should carefully consider whether you understand how leveraged financial instruments work and whether you can afford the high risk of losing your capital.
CFTC Rule 4.41 — Hypothetical or simulated performance results have inherent limitations. Unlike actual performance records, simulated results do not represent real trading. Because trades have not actually been executed, these results may under- or over-compensate for the impact of market factors such as liquidity. No representation is being made that any account will achieve profits or losses similar to those shown.


