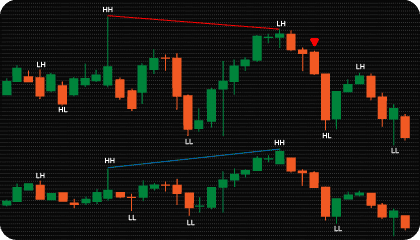
The cTrader SMT Divergence Indicator is built around SMT (Smart Money Technique) Divergence, an intermarket divergence concept used in ICT (Inner Circle Trader) and Smart Money Concepts (SMC) methodologies.
Correlated instruments usually move with similar structure. When one instrument makes a new high or low and the correlated one does not confirm it, that mismatch is often read as weakening momentum or a shift in participation between the two instruments.
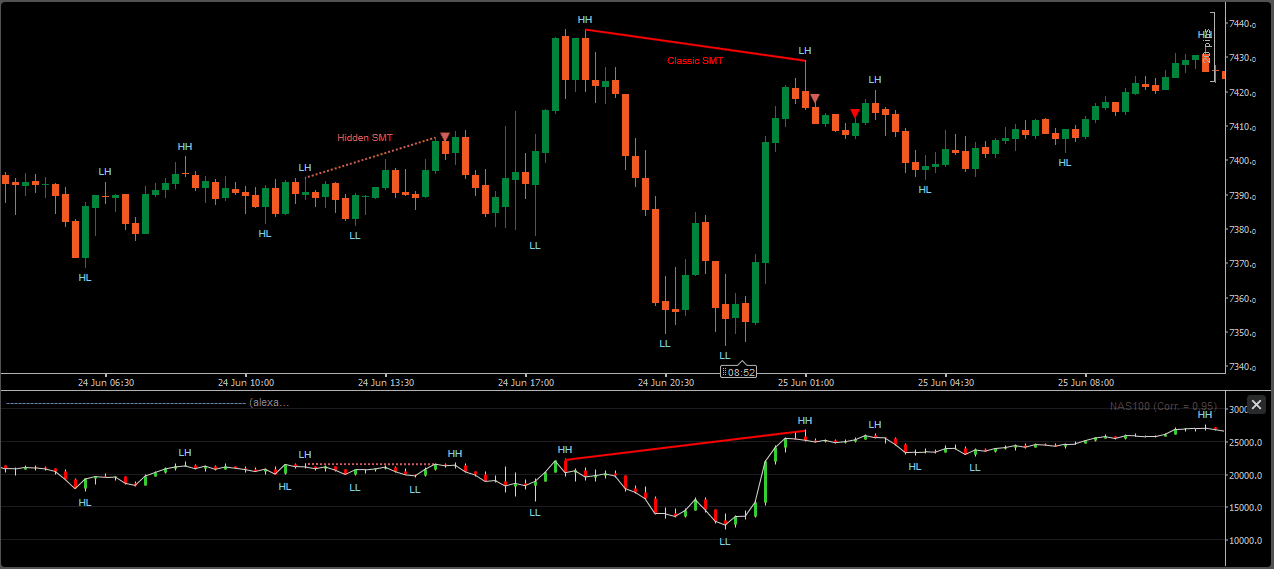
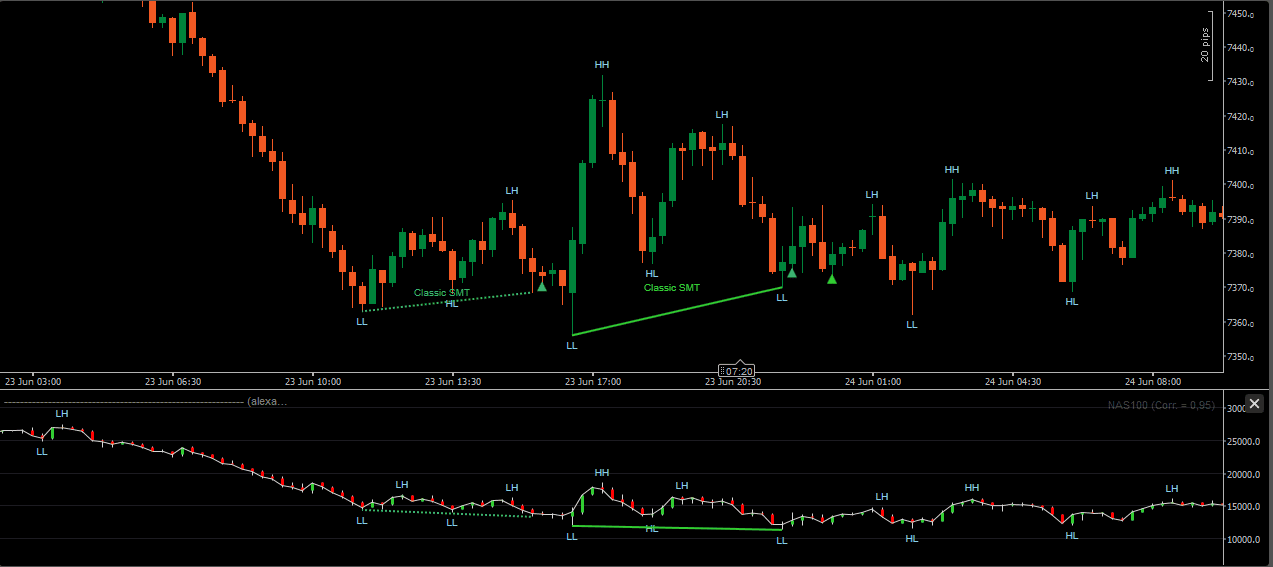
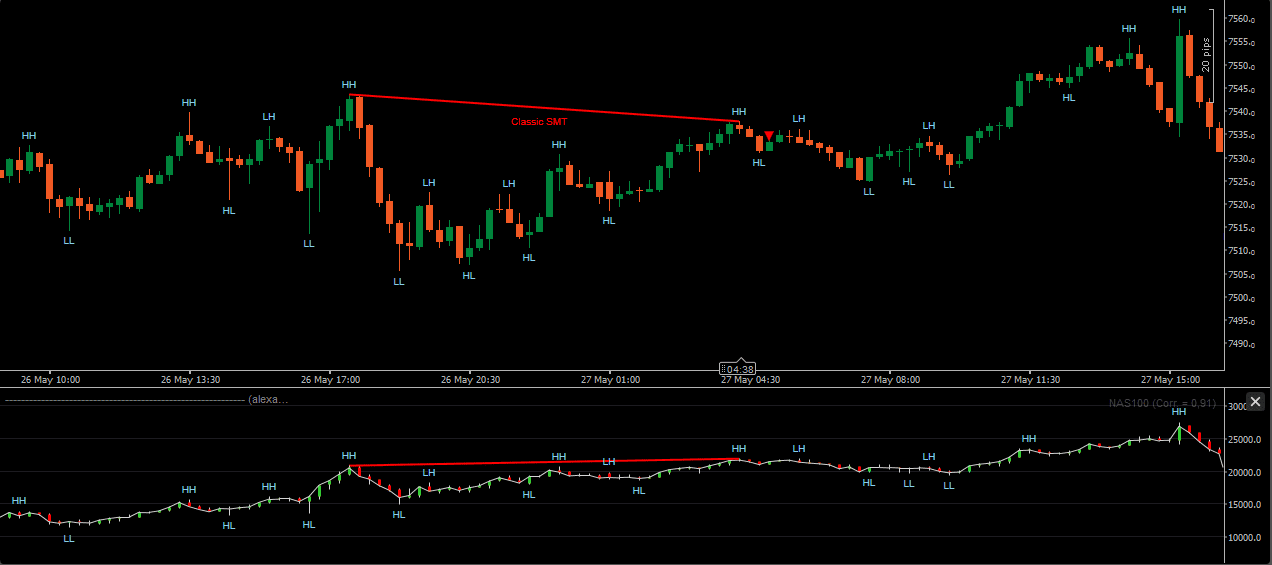
Classic SMT is built around that failed confirmation at highs or lows. A bearish Classic SMT appears when one instrument makes a higher high and the correlated instrument does not. Bullish Classic SMT follows the same logic on lows.
The indicator also supports Hidden SMT divergence, which is the inverted version of Classic SMT and is usually read as continuation rather than reversal. In bearish Hidden SMT, the correlated instrument keeps pushing higher while the analyzed instrument does not show the same strength. Hidden bullish SMT follows the same idea on lows.
Because SMT depends on swing structure and timing alignment between two instruments, small changes in swing validation can affect whether a divergence is detected. The indicator handles this with configurable swing logic, timing tolerance, and structural filters instead of relying on a fixed pattern.
The indicator supports two SMT types: Classic and Hidden.
In Classic SMT, one instrument makes a new high or low while the correlated instrument fails to follow. That mismatch shows up at the structural extreme.
Hidden SMT flips that pattern. The correlated instrument pushes further, while the analyzed instrument does not. This is generally read as a continuation signal rather than a reversal signal.
Each divergence type can be toggled independently, so the indicator can run Classic only, Hidden only, or both at the same time — for bullish and bearish structures alike.
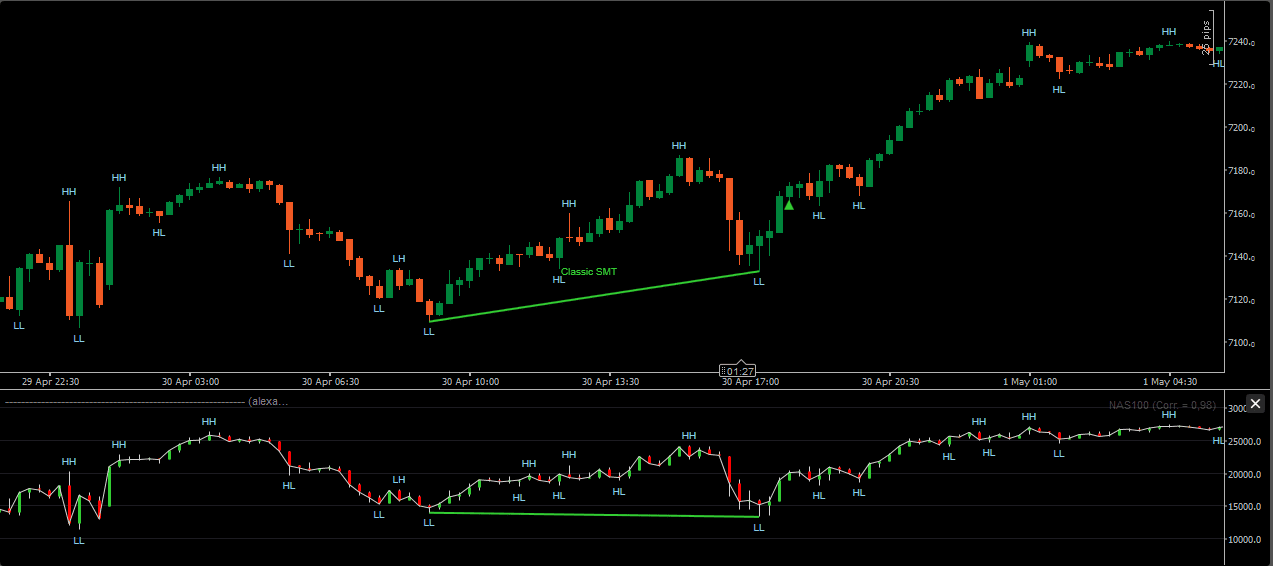
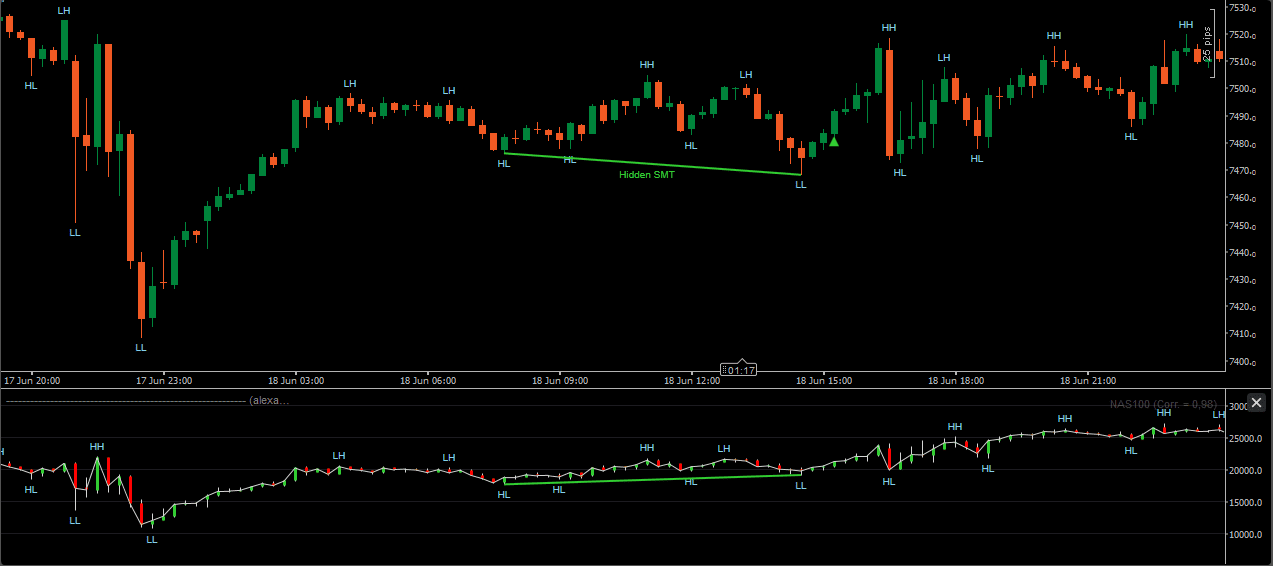
SMT can be tracked in two distinct states: Forming and Confirmed.
A Forming SMT condition appears while the swing point is still developing, before it passes Swing Strength validation. It’s an early read, and it can still disappear if the swing later develops differently.
A Confirmed SMT condition appears only after the swing passes validation. The structure is already settled by the time it shows up.
When Forming SMT is enabled, early markers stay on the chart even if the swing later resolves differently.
Speed versus certainty — the indicator lets both states run side by side.
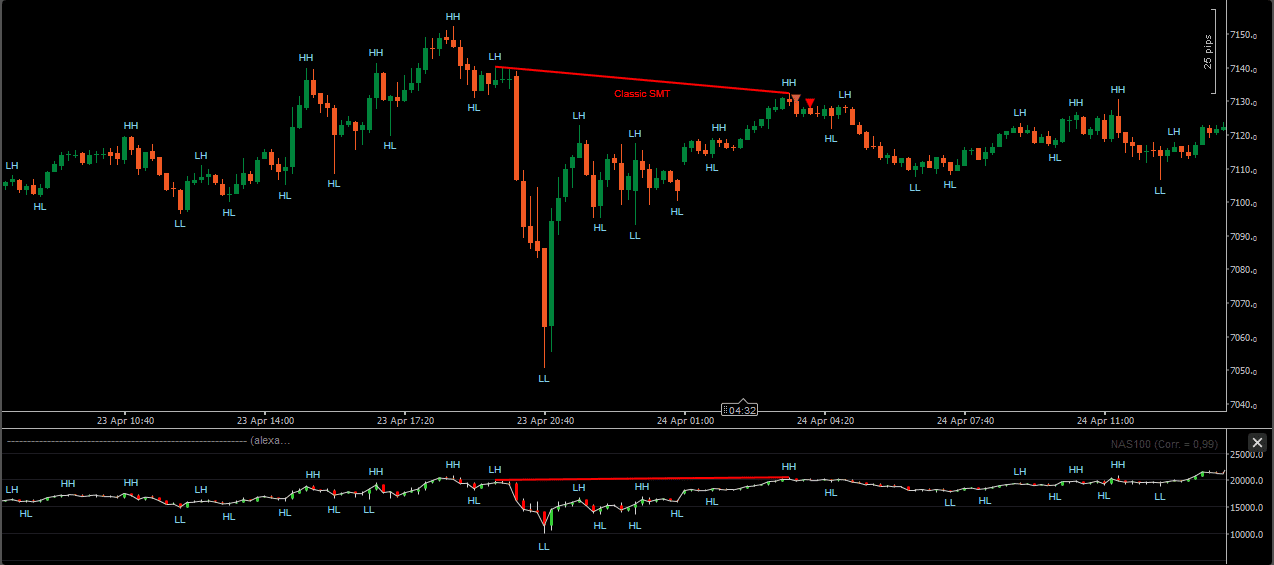
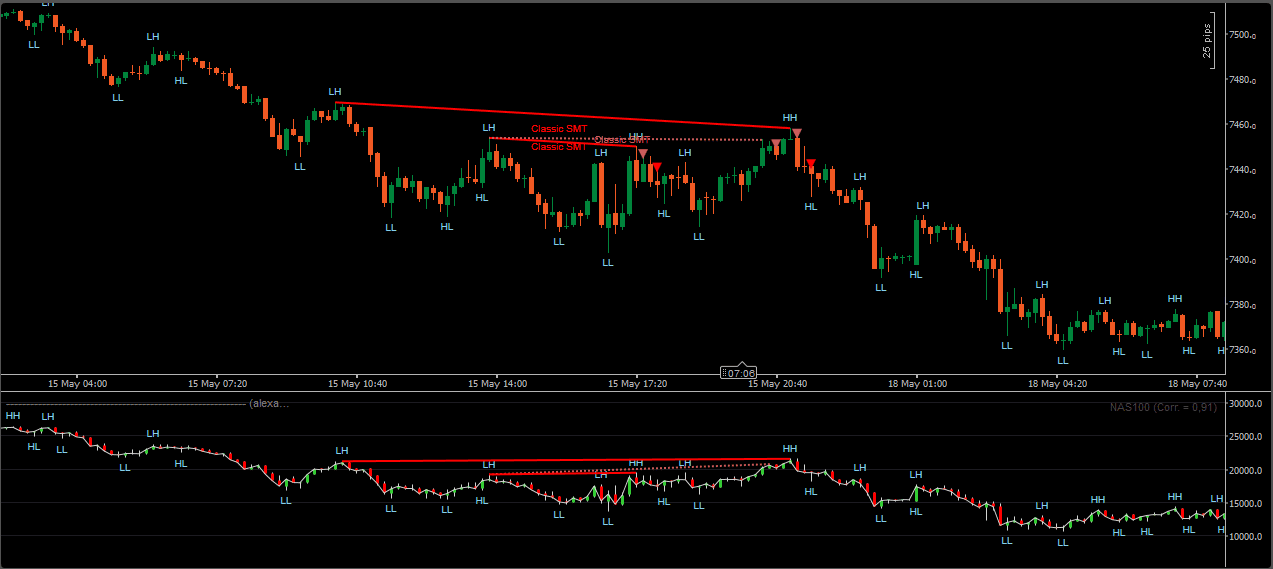
SMT detection is based on swing structure, not raw candle patterns, so the quality of the swings directly affects how divergence is detected.
Swing Strength sets the bar for what counts as a valid high or low. Raise it and only more developed swings qualify; lower it and the indicator reacts to shorter-term structure.
Vertex Match Tolerance controls how far apart two swings can be and still count as a match. The correlated instrument does not need to form its swing on the same bar — the indicator checks within a configurable number of bars on either side.
SMT Min Bars Distance filters out swing points that are too close together, which helps remove shallow, short-lived structures.
A separate strength filter can require a minimum price displacement before a divergence qualifies, measured in either ticks or percentage.
Beyond swing validation, optional filters can decide whether a divergence is allowed to appear at all.
Available filters:
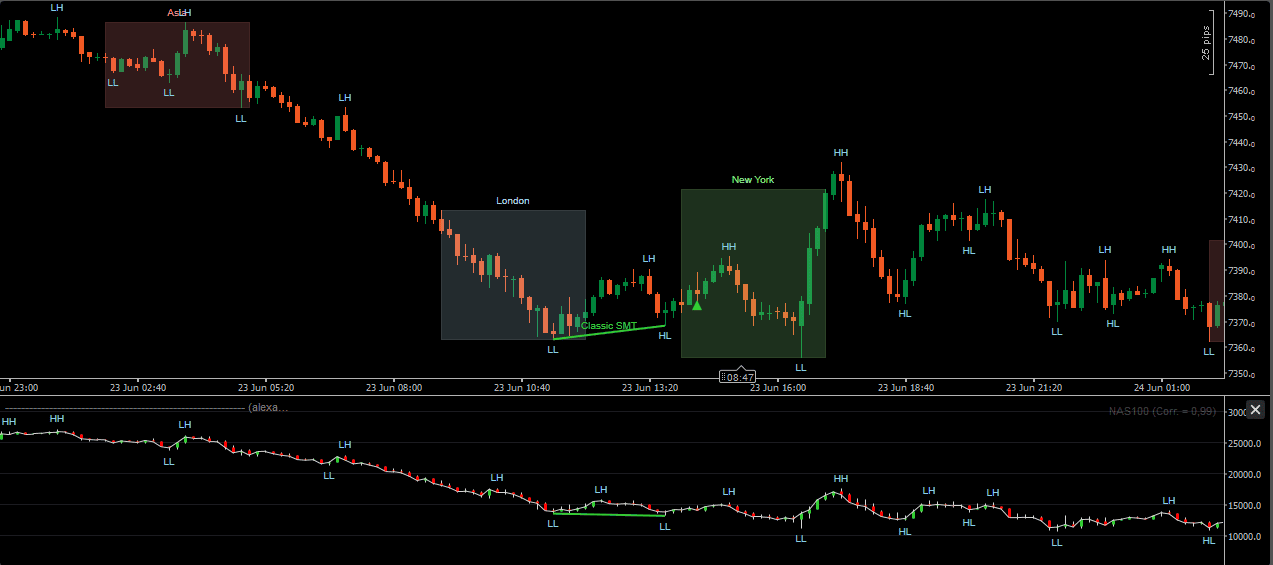
The Volume Filter compares current activity with a lookback average before letting a signal through. The EMA and Higher Timeframe EMA filters require price to be on a specific side of a moving average — one on the chart timeframe, the other on a higher timeframe. The VWAP Filter works the same way relative to session VWAP.
Kill Zones restrict detection to chosen time windows — Asia, London, New York, or a custom session — so SMT conditions outside those hours are ignored.
Each filter runs independently and can be combined with any of the others.
A separate panel shows the correlated instrument alongside the primary chart, so a second chart window isn’t needed.
SMT divergence lines appear on both the primary chart and the correlated panel, making the relationship between the two instruments easier to see at a glance.
A second correlated instrument can also be added, so the primary chart can be compared against two markets at once. Signal markers stay on the primary chart; the correlated panel itself is reserved for structural comparison.
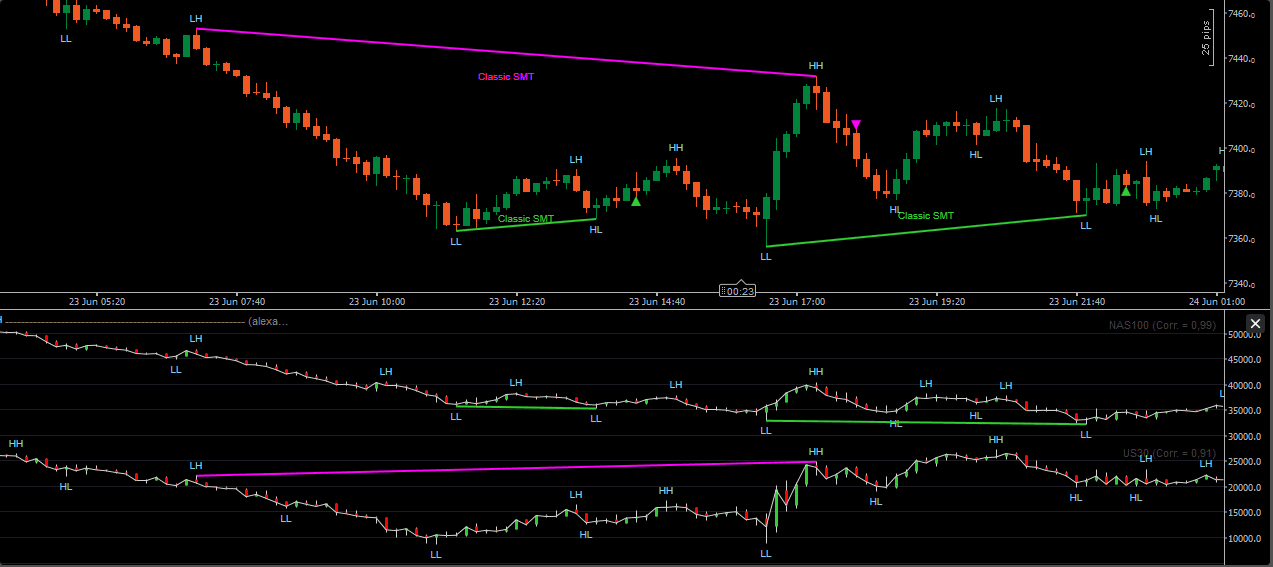
SMT structures, swing labels, and the correlated asset panel can all be styled independently from the main chart.
Bullish, bearish, Forming, and Confirmed SMT structures each have their own color, and when a second correlated instrument is active, its SMT structures use a separate color set so the two comparisons stay visually distinct.
Classic and Hidden SMT labels can be renamed or hidden, and swing labels and SMT labels can be adjusted in size and color.
Inside the correlated asset panel, candles, candle body width, outline and wick color, and the correlated instrument’s value display can all be shown or hidden and styled separately from the primary chart.
A Classic SMT condition appears when the analyzed instrument and its correlated counterpart stop agreeing at the structural extremes.
In a bearish Classic SMT, the analyzed instrument prints a higher high while the correlated instrument fails to follow with its own higher high. A bullish Classic SMT mirrors this on the low side.
Because the two instruments are usually expected to move together, disagreement at a key swing point is often read as a sign that the move is losing the confirmation it would normally have.
Hidden SMT uses the inverted version of the same relationship and is generally read in the opposite context from Classic SMT.
In a bearish Hidden SMT, the correlated instrument keeps printing stronger highs while the analyzed instrument fails to match that strength. Bullish Hidden SMT follows the same pattern on lows.
Same comparison between two instruments. Different structural setup, different interpretation.
A Forming SMT condition appears before the swing point behind it has been fully validated — the structure is still taking shape.
A Confirmed SMT condition only appears once that swing point clears the Swing Strength validation. By the time it shows up, the structure behind it is already settled.
Forming SMT gets there first. Confirmed SMT gets there with more behind it.
The correlated panel puts both instruments in view at once, so structural divergence doesn’t have to be pieced together by switching between two separate charts.
Divergence lines appear on both the primary chart and the correlated panel simultaneously, making it straightforward to follow how the two instruments diverge from each other as the structure develops.
With a second correlated instrument enabled, the primary instrument can be compared against two separate markets at the same time — which makes it possible to see whether a divergence is isolated to one relationship or shows up across both.
Each filter narrows down when an SMT condition is allowed to register, rather than changing how SMT itself is detected.
The Volume Filter holds back signals during periods of weaker participation. The EMA, Higher Timeframe EMA, and VWAP filters require price to sit on a specific side of their respective reference line before a divergence qualifies.
Kill Zones restrict detection to selected time windows — Asia, London, New York, or a custom session — so SMT conditions outside those hours are ignored, regardless of how the filters above are configured.

Need changes to this indicator? We can customize the cTrader SMT Divergence Indicator to your specifications — adding new functions, modifying logic, refining visuals, or integrating it with other cTrader tools.
We also convert indicators into cBots with advanced features such as trailing stops, position parameter controls, execution filters, and rule-based automation built to your technical specifications.
Request a free consultation to discuss the technical scope, timeline, and available development options.
We are committed to the ongoing development and refinement of our indicators. If you’ve spotted a bug, feel that something essential is missing, or have ideas that could make the indicator even better, just send us a message. Your feedback helps us improve and deliver tools that truly meet traders’ needs.
SMT divergence is an intermarket divergence concept used in ICT and Smart Money Concepts methodologies. The cTrader SMT Divergence Indicator detects this condition when one instrument makes a new high or low while a correlated instrument fails to confirm the same move.
Classic SMT is built around failed confirmation at highs or lows and is generally read as a possible reversal signal. Hidden SMT uses the inverted version of that relationship and is generally read as continuation rather than reversal.
A Forming SMT condition appears before the related swing point has passed Swing Strength validation. A Confirmed SMT condition only appears once that swing point clears validation. Forming SMT reacts earlier; Confirmed SMT reacts later, with more structure behind it.
When Forming SMT is enabled, early markers stay on the chart rather than disappearing if the swing later resolves differently. Forming SMT still represents developing structure, while Confirmed SMT requires fully validated swing points.
Most SMT indicators detect divergence on a fixed swing pattern and offer little control over how the two instruments are compared. The cTrader SMT Divergence Indicator adds configurable Swing Strength, a timing tolerance between the two instruments’ swings (Vertex Match Tolerance), separate Forming and Confirmed states, multiple qualification filters, and support for a second correlated instrument — alongside a dedicated panel for visually comparing the correlated asset against the primary chart.
Yes. A second correlated instrument can be enabled in addition to the primary one, allowing the analyzed instrument to be compared against two separate markets at the same time.
It controls how far apart in time two swing points are allowed to be while still counting as a match. The correlated instrument’s swing does not need to form on the exact same bar — the indicator checks within a configurable number of bars on either side.
Yes. The Kill Zones filter can restrict SMT detection to Asia, London, New York, or a custom session window, so conditions outside those hours are ignored.
Nordman Algorithms is a trade name of Nordman Algorithms OÜ (Reg. No. 14435535), registered in Tallinn, Estonia.
Software Nature & User Responsibility — Nordman Algorithms provides algorithmic software tools for technical analysis. Nordman Algorithms is not a financial advisor and is not liable for any losses. All trades conducted based on the software’s output are executed at the user’s sole discretion and risk.
Visual Markers & Signal Disclosure — This software may display visual markers (such as arrows, dots, or alerts) when predefined mathematical conditions are met. These markers are provided for educational and analytical purposes only, must not be interpreted as financial guidance, and do not constitute a recommendation to buy, sell, or hold any financial instrument. Users must independently validate all visual cues within their own trading methodology.
No Financial Advice — Nordman Algorithms does not provide discretionary trading signals, investment advice, or managed signal services. Our software represents a mathematical visualization of historical and real-time data. The appearance of a visual marker does not guarantee a profitable trade or predict future market behavior.
Trading Risk Warning — Forex, CFDs, futures, options, and other leveraged financial instruments involve significant risk. Risk capital is money that can be lost without jeopardizing financial security. Only risk capital should be used for trading. Past performance is not indicative of future results. View Full Risk Disclosure: https://www.nordman-algorithms.com/risk-disclosure/
ESMA Risk Warning — Financial instruments, especially those involving leverage such as CFDs and Forex, are complex and carry a high risk of rapid financial loss. Our software provides analytical outputs and visual markers based on predefined mathematical conditions and does not mitigate or reduce inherent market risks. You should carefully consider whether you understand how leveraged financial instruments work and whether you can afford the high risk of losing your capital.
CFTC Rule 4.41 — Hypothetical or simulated performance results have inherent limitations. Unlike actual performance records, simulated results do not represent real trading. Because trades have not actually been executed, these results may under- or over-compensate for the impact of market factors such as liquidity. No representation is being made that any account will achieve profits or losses similar to those shown.