INSTRUCTION SECTIONS OVERVIEW:
1. INTRODUCTION TO THE MT5 TO NINJATRADER TRADE COPIER
3.1 Installing and Configuring the MT5 Sender Indicator
3.2 Installing and Configuring the NinjaTrader Receiver Indicator
3.3 Establishing and Checking the Connection Between Sender and Receiver
4.2 Sender Parameters and Their Description
4.3 Receiver Parameters and Their Description
5.1 Types of Orders Copied and their processing
5.2 Partial Execution and Order Modification
5.3 Order Execution Specifics for MT5 Hedging Accounts (FIFO Logic)
6. SUPPORT AND CONTACT INFORMATION
The MT5 to NinjaTrader Trade Copier is a local trade copying solution that replicates trades from MetaTrader 5 to NinjaTrader 8 in real time. It supports both manual and automated strategies, multi-symbol trading, and adjustable lot scaling. The copier operates on a single machine using an MT5 indicator (Sender) and a NinjaTrader indicator (Receiver), ensuring fast and synchronized execution.
This version of the copier is designed for local operation, meaning both MT5 and NinjaTrader must be running on the same computer. All trade replication takes place locally without the use of external servers.
The MT5 to NinjaTrader Trade Copier operates as an integrated solution that connects MetaTrader 5 with NinjaTrader 8 through two core components:
Copying trades is only possible in one direction: from MetaTrader 5 to NinjaTrader 8. Due to technical limitations of the platforms, simultaneous two-way trade copying is not supported. If you need to copy trades from NinjaTrader to MT5, please visit the NinjaTrader to MT5 Trade Copier product page.
Do not start using this product on a live account. First, thoroughly test all features on a demo account to ensure you fully understand its capabilities and limitations. Only after you are fully confident in its operation should you consider using it on a live account.
To ensure the Trade Copier works correctly, make sure your MT5 terminal is updated to the latest available version before installation.
To start using the MT5 to NinjaTrader Trade Copier, you will need a licensed email address. A 5-day free trial is available — you can test the copier before committing to a paid subscription. If you don’t cancel within 5 days, the monthly subscription will start automatically.
To subscribe, click the “Subscribe to All Products” button on the product page. After completing the payment, return to the product page, click “Member Access”, enter the email address you used during the subscription process. Then click “Download” — a zip file containing all the necessary components will automatically be downloaded to your device.
You may cancel your subscription at any time through your PayPal account. To avoid unintended charges, please remember to cancel if you no longer require the service.
Currently, all of our products are available under a single subscription. In addition to the MT5 to NinjaTrader Trade Copier, you will also gain access to all our indicators and other trade copiers.
The ZIP file downloaded from the product page contains two components: the .ex5 file named “Nordman_MT5NT8_Sender” (Sender) for installation in MetaTrader 5, and the ZIP archive “NordmanMT5NT8Receiver” (Receiver) for installation in the NinjaTrader 8 platform.
Note: Both the Sender and the Receiver are implemented as indicators rather than an Expert Advisor / Strategy pair. This means installation goes into each platform’s Indicators folder, and — on the NinjaTrader side — there is no separate “Enable” step; the Receiver becomes active as soon as it’s added to the chart.
Step 1: Import the “Nordman_MT5NT8_Sender.ex5” file (indicator) into MetaTrader 5
1. Extract the file “Nordman_MT5NT8_Sender.ex5” from the general ZIP archive “Nordman_MT5_to_NT8_Trade_Copier“.
2. Open or launch your MetaTrader 5 terminal.
3. Go to the designated folder in the MetaTrader 5 terminal for placing custom indicators. To do this, click “File” in the terminal’s main menu and then select “Open Data Folder“.
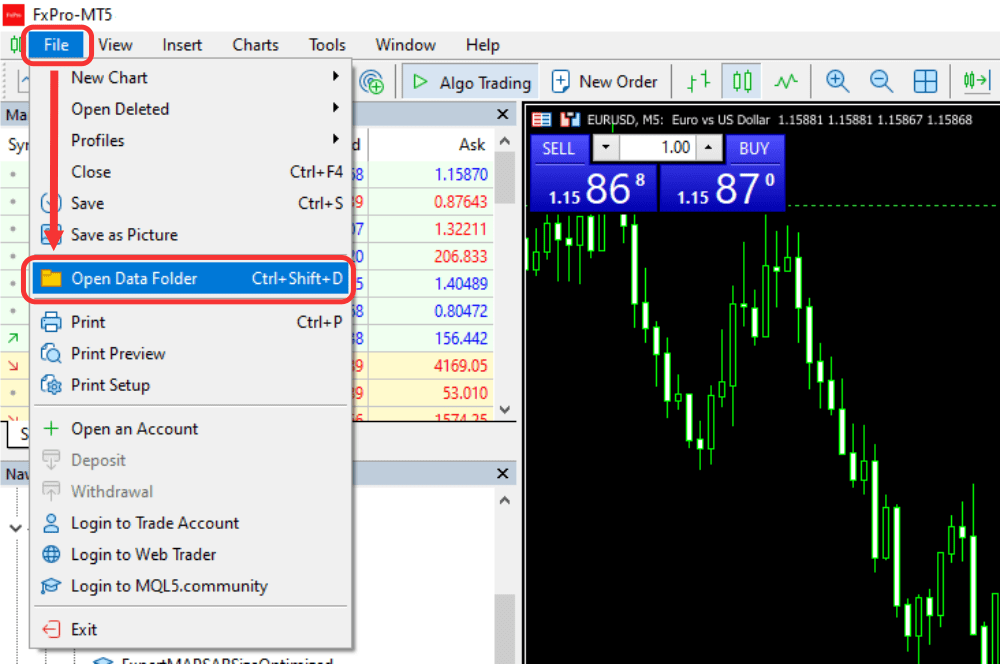
4. In the folder that opens, go to the MQL5 folder, then open the Indicators folder. Paste the “Nordman_MT5NT8_Sender.ex5” file into the Indicators folder.
Step 2: Verify File Import
1. Open the Navigator window. If the Navigator panel is not visible, go to the “View” menu and enable “Navigator”, or press the Ctrl + N keyboard shortcut.
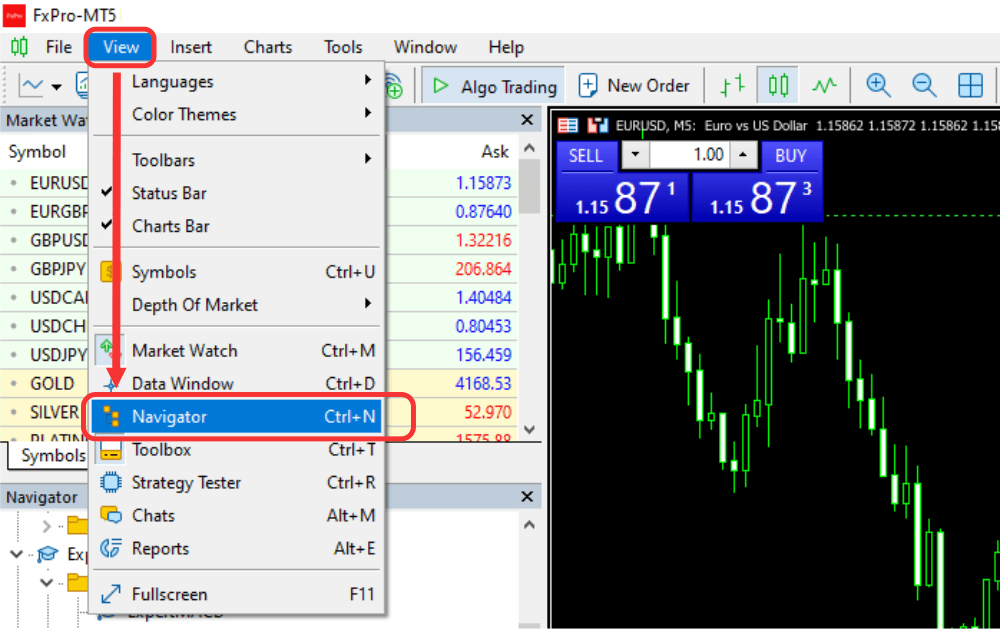
2. In the Navigator window, select the “Indicators” section, right-click it, and then click “Refresh“.
3. Confirm that “Nordman_MT5NT8_Sender” appears in the updated Navigator window. This confirms successful import into the terminal.
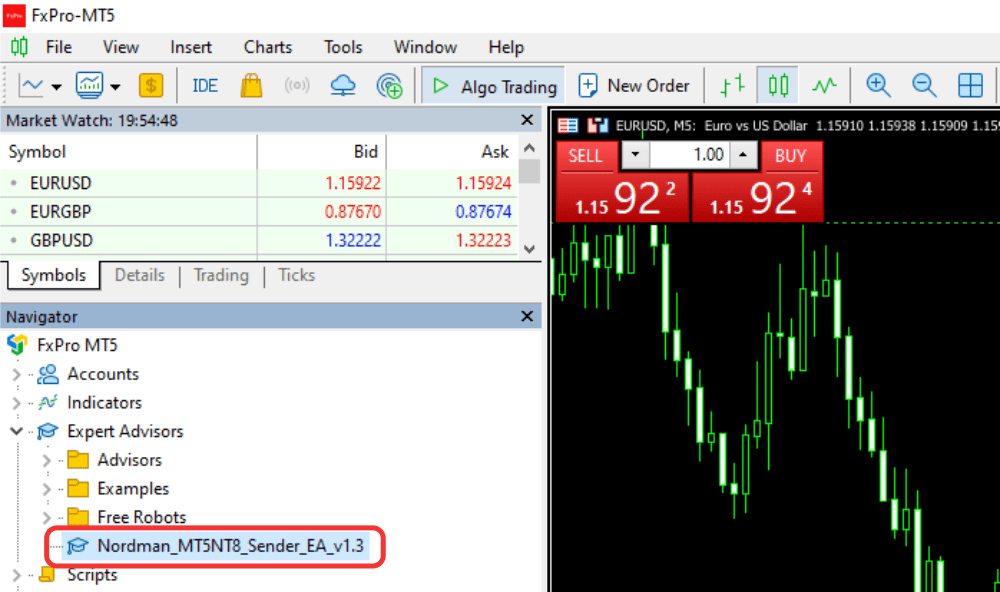
Step 3: Attach the Indicator to the Chart and Configure It
1. Open the Navigator window. If the Navigator panel is not visible, go to the “View” menu and enable “Navigator”, or press the Ctrl + N keyboard shortcut.
2. In the “Indicators” section, locate “Nordman_MT5NT8_Sender“. Drag it onto the chart using your mouse, or right-click it and select “Attach to a Chart“.
3. In the indicator settings window, go to the “Inputs” tab: configure it according to the instructions in paragraph 4.2, “Sender Parameters and Their Description”.
Step 1: Import the “NordmanMT5NT8Receiver” zip file into NinjaTrader trading terminal
1. Open your NinjaTrader trading terminal. In the “Control Center” window, click the “Tools” menu, then select “Import” and choose “NinjaScript Add-On“.
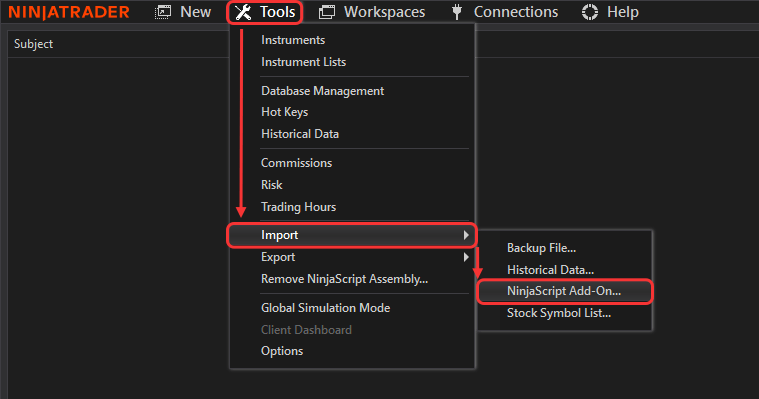
2. When prompted to select a file with the *.zip extension, specify the folder where you saved the downloaded zip file. Select the file “NordmanMT5NT8Receiver” (do not unpack/extract the zip file) and click “Open” to begin the installation process.
3. Verify that the import was successful. Once the add-on is imported, NinjaTrader will display the message: “NinjaTrader successfully imported all scripts contained in the NinjaScript Archive File.“
Step 2: Attach the Receiver Indicator to the Chart
1. Right-click on the chart area in NinjaTrader and select “Indicators” from the menu.
2. In the “Indicators” window, locate “NordmanMT5NT8Receiver“, click on it, and press “Add“.
Now you can begin configuring the indicator’s parameters.
Step 3: Configure the Receiver Parameters
Refer to paragraph 4.3, “Receiver Parameters and Their Description“ to configure the indicator’s settings. At minimum, set the Account Name to the NinjaTrader account you want the Receiver to trade on, and the Sender ID to match the value configured on the MetaTrader 5 side.
Once configured, click “OK” — the Receiver is active as soon as it’s added to the chart. There is no separate “Enable” step and it will not appear under a “Strategies” tab in the Control Center.
To establish a proper connection, it is important to follow the correct order when setting up the Sender and Receiver. The Sender must always be installed first.
1. Setting Up the Sender:
2. Setting Up the Receiver:
After attaching the Sender and Receiver to their respective charts, ensure that the connection between them has been successfully established. Both components include connection indicators to confirm this. If everything is configured correctly, the indicators will display the status “Connected“.
If all connection indicators show the status “Connected”, the Trade Copier is fully operational, and you can begin copying trades.
If any connection indicators display “Disconnected“, the most common reasons for this status are:
Please verify that the “Sender ID“ is correctly specified for the symbols being copied.
If you are confident that the issue is not caused by these factors, refer to Section 6: “Support and Contact Information“ for important details before reaching out to technical support.
The Sender is an indicator for MetaTrader 5 designed to record entry and exit events for positions executed on a specified symbol. It tracks all actions on the chart where it is attached and transmits the corresponding data in real time to the Receiver through a dedicated local connection.
The Receiver, implemented as a NinjaTrader indicator, processes and executes the orders sent by the Sender. Using the “Sender ID” parameter as an identifier, it links signals from the Sender to the correct Receiver instance. All positions are then copied directly from the Sender to the chart where the Receiver indicator is applied, on the NinjaTrader account selected in its “Account Name” parameter.
The Sender tracks only the orders placed on the symbol to which it is attached. For example, if the Sender is placed on AUDCAD, it will not track or copy orders from EURUSD.
If multiple charts are open for the AUDCAD symbol and the Sender is attached to one of them, it will track executions across all AUDCAD charts. To copy trades for multiple symbols, you must use separate Senders with unique Sender ID parameters for each symbol — and, since brokers may label the same instrument differently, no manual ticker mapping between MT5 and NinjaTrader is required beyond attaching each Sender/Receiver pair to the matching charts.
Example:
| Symbol to be Copied |
Trade Copier Connection Channel |
“Sender ID” in the Sender (MT5 Indicator) |
“Sender ID” in the Receiver (NinjaTrader Indicator) |
|---|---|---|---|
| EURUSD | Sender #1 ➜ Receiver #1 | MyWordMyNumbers | MyWordMyNumbers |
| GBPUSD | Sender #2 ➜ Receiver #2 | Nordman001 | Nordman001 |
Important:
• Monitor the charts where the Sender and Receiver are placed. Changing the symbol on either chart may cause trades to be copied to an unintended instrument.
• For example, if you are browsing charts and accidentally change the symbol on the Receiver chart, the Sender will still send orders, but the Receiver will execute them on the newly selected symbol.
• Note that orders are copied based on the Sender ID, not the symbol. For instance, if the Sender is attached to a GBPUSD chart and the Receiver chart is set to GOLD instead of GBPUSD, then opening 1 lot of GBPUSD in the Sender will cause the Receiver to open 1 lot of GOLD.
#License Email
Field for entering the license email address. Enter the email address used during the subscription process. Specifying an email address is mandatory for the proper operation of the Trade Copier — without it, the Trade Copier will not function. For more information about the license email, refer to paragraph 2 “PRODUCT LICENSE“.
#Sender ID
The Sender ID parameter serves as an identifier within the system. The server uses this value to establish a connection between the Sender and the Receiver. Only one Sender with a given ID can be active at any time. If you attempt to connect multiple Senders with the same Sender ID, a warning message will appear. Avoid using special characters when configuring your Sender ID — use only letters and numbers.
#Magic Number
The Magic Number parameter allows you to specify the types of trades that will be copied:
| Magic Number Value | Description |
|---|---|
| Magic Number = -1 | The Sender will capture all market trades on the attached instrument. |
| Magic Number = 0 | The Sender will capture only manually opened market trades. |
| Magic Number > 0 | The Sender will capture market trades with this specific magic number only. |
Ensure your Magic Number settings are configured correctly to achieve the desired trade-catching behavior.
#Enable Connection Loss Alert
Enables an alert that notifies you when the Sender loses connection with the Receiver. If activated, the system will display a warning whenever the connection is interrupted, helping you react promptly to any disruption in trade copying.
#Stable Connection Duration (seconds)
Works together with Enable Connection Loss Alert. Sets the minimum number of seconds the connection must have been stable before a subsequent drop triggers the alert. This avoids firing an alert for a very brief reconnect right after the Sender starts up.
#Enable Logging
Writes detailed activity logs to the Sender’s log file. Useful for diagnosing connection or trade-copying issues; can be left disabled during normal operation.
#License Email
Field for entering the license email address. Enter the email address used during subscription. Providing a valid email address is mandatory for the proper operation of the Trade Copier — without it, the Trade Copier will not function. For more detailed information about the license email, refer to paragraph 2 “PRODUCT LICENSE“.
#Account Name
Selects which connected NinjaTrader account this Receiver instance trades on. Choose the account from the dropdown list of currently connected accounts.
#Sender ID
The Sender ID parameter serves as a unique identifier for connecting to the Sender. To establish a proper connection between the Sender and Receiver, you must enter the same value that is set on the MetaTrader 5 Sender side.
#Lot Multiplier
This parameter adjusts the lot size of trades copied to the Receiver. The lot size of the original trade is multiplied by this value before being executed on the Receiver side.
Formula: MT5 lot size × Lot Multiplier
Using this parameter is important when the lot specifications for the same asset differ between brokers. For example, suppose you are trading the asset ABC. At the sending broker, 1 lot of ABC equals 10 units, while at the receiving broker, 1 lot equals 1 unit. To ensure that the equivalent position size is copied correctly, you must set Lot Multiplier = 10.
Conversely, if 1 lot of ABC equals 1 unit at the sending broker and 10 units at the receiving broker, you must set Lot Multiplier = 0.1.
This ensures that your position size remains consistent across platforms.
#Use Custom Order Name
When enabled, reveals the Long Order Name and Short Order Name fields below, letting you replace the default order labels the Receiver assigns to Buy and Sell entries with your own text. Leave disabled to use the default naming.
#Assign ATM to Entries
When enabled, lets you attach a NinjaTrader ATM strategy to trades opened by the Receiver directly through Chart Trader — select the ATM strategy you want to use, and it is applied automatically to every trade the Receiver opens. In this mode, only entries are copied from MT5; exits, including Stop Loss and Take Profit, are managed by the selected ATM strategy instead of being copied from MT5.
#Reverse Trades
When enabled, mirrors the copied direction — a Buy signal from MT5 opens a Sell on the Receiver side, and vice versa.
#Enable Debug Log
Logs all trading events in the related log file.
#Enable Prop Limits
Master switch for the entire prop trading limits block below. When disabled, none of the individual limits are active, regardless of their own settings.
#Enable Daily Loss Limit / Daily Loss Limit / Daily Loss Limit Flatten Upon Breach
Stops new trades once the account’s realized plus unrealized daily loss reaches the configured amount. If Flatten Upon Breach is enabled, all open positions on the instrument are also closed automatically when the limit is hit; if disabled, only new trades are blocked and existing positions remain open.
#Enable Daily Profit Limit / Daily Profit Limit / Daily Profit Limit Flatten Upon Breach
Stops new trades once the account’s realized plus unrealized daily profit reaches the configured amount. The Flatten Upon Breach toggle works the same way as for the Daily Loss Limit.
#Enable Max Position Limit / Max Position Limit
Blocks new trades once the number of simultaneously open lots on the instrument reaches the configured value. Unlike the other prop limits, this one only blocks new trades — it does not close existing positions when reached.
#Enable Min Account Balance Limit / Min Account Balance Limit / Min Account Balance Limit Flatten Upon Breach
Stops new trades once the account balance (including unrealized P/L) drops below the configured floor. If Flatten Upon Breach is enabled, open positions are also closed automatically.
#Enable Trading Hours Limit / Trading Hours Limit / Trading Hours Limit Flatten Upon Breach
Restricts trading to a defined time window, entered as a start/stop pair (e.g. 09:30/15:55). Outside that window, new trades are blocked; if Flatten Upon Breach is enabled, open positions are also closed automatically once the window ends.
| Market Orders | Pending (Limit) Orders |
|---|---|
| Market orders are copied immediately. Typically, the copying speed is under one second, although the speed and quality of your internet connection may affect this. | Pending orders are not copied at the moment they are placed. Instead, they are copied to the Receiver only when the order is triggered (executed). Why Are Pending (Limit) Orders Not Copied Immediately? Because Bid/Ask prices may differ across platforms and brokers, a situation may occur where a limit order is triggered on one side but not on the other. This can lead to desynchronized positions, which is why pending orders are copied only when they are actually executed. |
Partial Execution: Orders are processed according to the market execution principle.
Order Modification: Orders are not copied at the moment they are placed or modified. Instead, they are copied to the Receiver only when they are actually executed, in accordance with the market execution principle.
If your MetaTrader 5 account is configured as a hedging account type, the Trade Copier applies a FIFO (First In, First Out) execution rule. This is necessary because NinjaTrader 8 operates exclusively on a netting model, where all positions are combined into a single net position.
In hedging mode, MT5 allows multiple independent positions on the same symbol, while NinjaTrader does not. Therefore, in order to maintain synchronization between platforms, the Trade Copier processes incoming trade signals using FIFO logic.
If your MT5 account uses the netting account type, no additional processing is required—both MT5 and NinjaTrader operate under the same netting model, allowing for straightforward one-to-one synchronization.
When multiple trades are open in MT5 and a reverse signal arrives (e.g., a Sell signal while long positions are open), the Receiver processes the trades in the order they were opened—oldest first.
This ensures that the resulting net position on NinjaTrader accurately reflects the intended position on MT5.
Assume the following long positions currently exist on the Receiver side:
If the Sender issues a Short signal for 5.0 lots, the Receiver will process it as follows:
This ensures that the final net position on NinjaTrader matches the intent of the executed trade on the MT5 hedging account.
We have prepared detailed instructions for you and hope they will address most of your questions and issues. If you have any further inquiries or encounter any technical problems, please contact us using the form on the Contact Us page.
Troubleshooting
The Sender (MT5 Indicator) and Receiver (NinjaTrader Indicator) generate detailed activity records in their logs. These logs are essential for diagnosing and resolving any issues. If you encounter an error, please send us the relevant log files along with a screenshot of the chart to help us troubleshoot your support request.
How to Access Logs in Terminals
| MetaTrader 5 | NinjaTrader 8 |
|---|---|
| Logs can be viewed in the Experts tab of the Terminal panel. To save the log files, right-click in the Experts log, select Open from the pop-up menu, and save the files. | Logs can be viewed in the Log tab of the Control Center’s bottom panel. To save the log files, right-click on the logs, select Export from the pop-up menu, and save them to your preferred folder. Log File Locations The related log files can also be found in the following folders: C:Users{YourUserName}DocumentsNinjaTrader 8_LogCustNordmanMT5NT8Receiver C:Users{YourUserName}DocumentsNinjaTrader 8log |
We are committed to the ongoing improvement of our MT5 to NinjaTrader Trade Copier.
If you encounter an issue, feel that an important feature is missing, or have suggestions that could make the copier more efficient or user-friendly, please send us a message.
Your feedback helps us refine the tool and better meet the needs of traders who rely on it every day.


